PDF Generation Template Editor
Open-source visual PDF generation engine with customizable templates and developer-friendly APIs.
ComPDF AI provides ready-to-use solutions for intelligent document extraction, enterprise knowledge bases, and document splitting. It converts unstructured documents into structured data and supports automated business workflows.
| Module | Description | Typical use cases |
|---|---|---|
| Intelligent document extraction | Extracts fields from invoices, contracts, policies, IDs, and other documents using semantic understanding and key-value pair technology. | ERP entry, invoice review, contract checks |
| Intelligent knowledge base | Builds a private knowledge base with AI-assisted search, answers, and source citations. | Support, training, compliance, internal search |
| Document splitting | Splits large PDF files into smaller documents using flexible page rules. | Archiving, distribution, preprocessing |
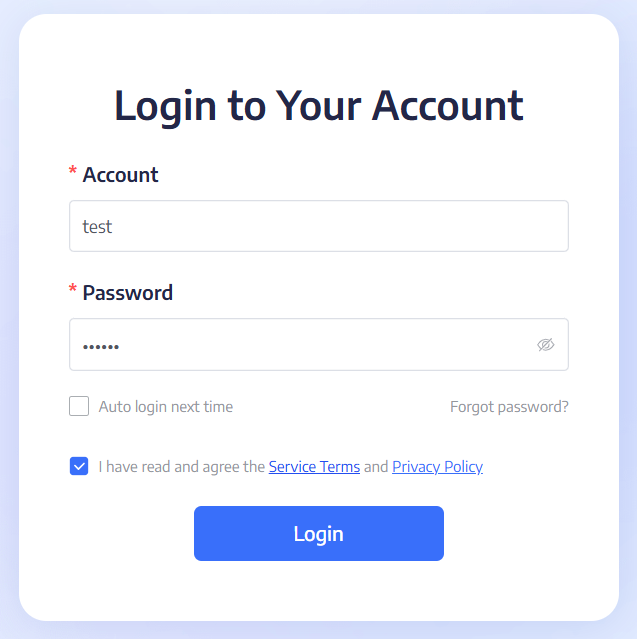
After signing in, use the left navigation or home shortcuts to open a product module.
You may select Keep me signed in for faster access next time. Contact a super administrator if you forget your password.
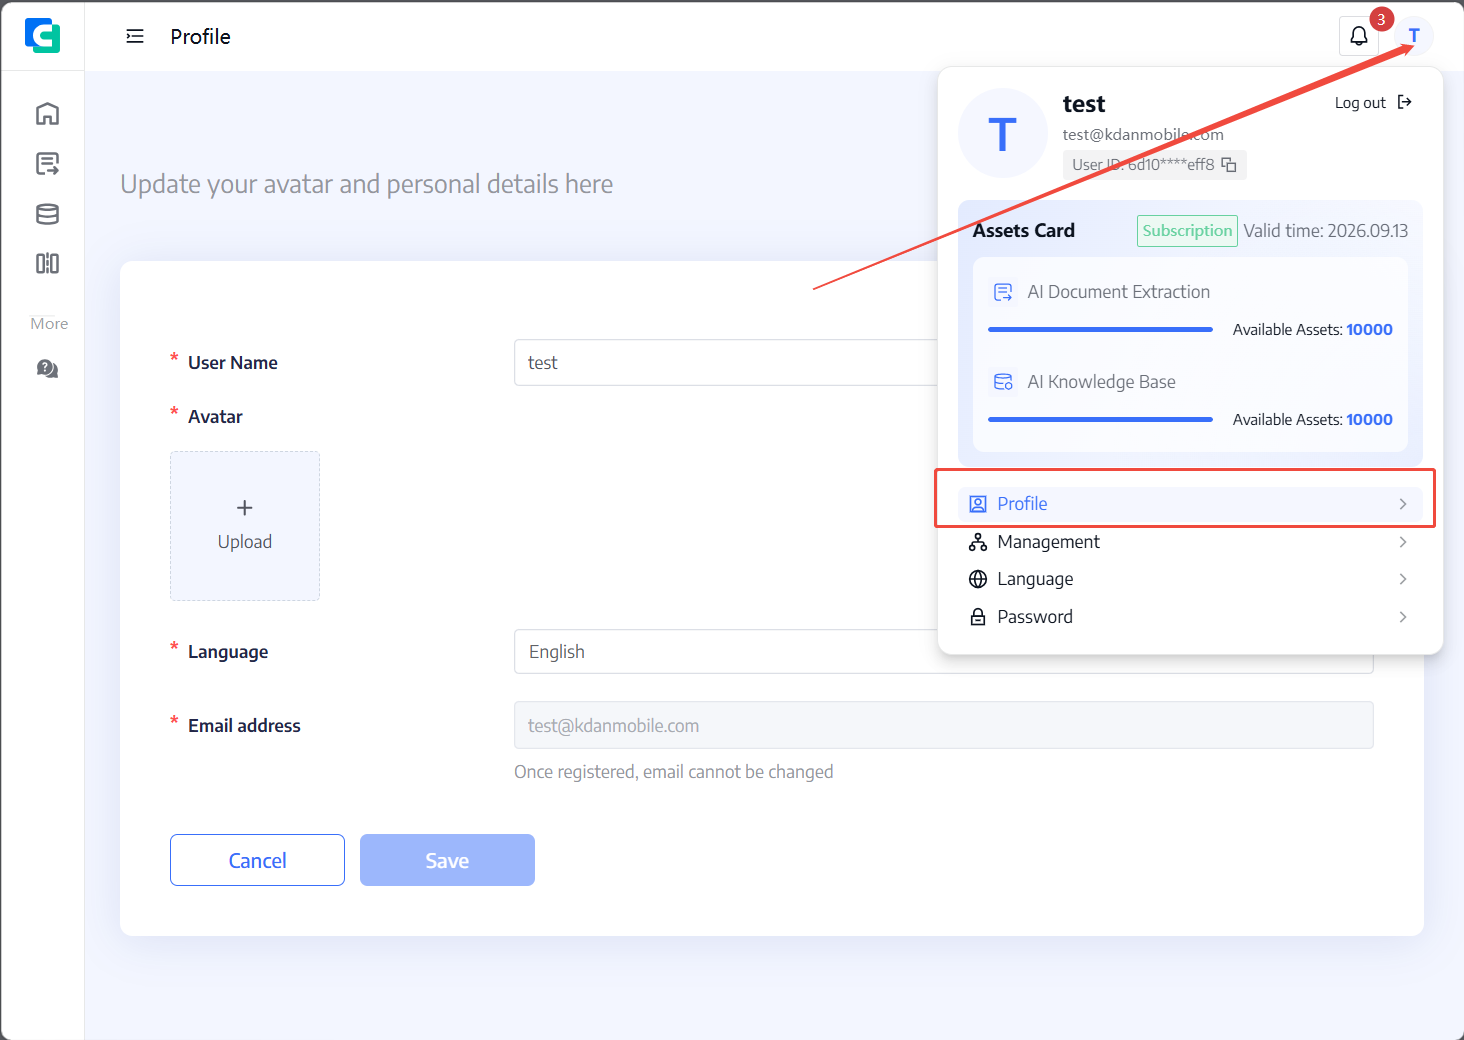
Select your account icon in the upper-right corner and choose Personal Center. You can update your display name, avatar, and language. The language switcher is also available in the lower-left corner.
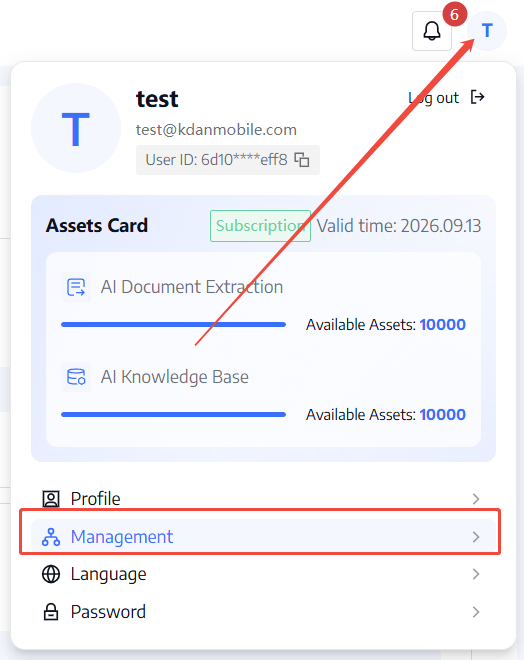
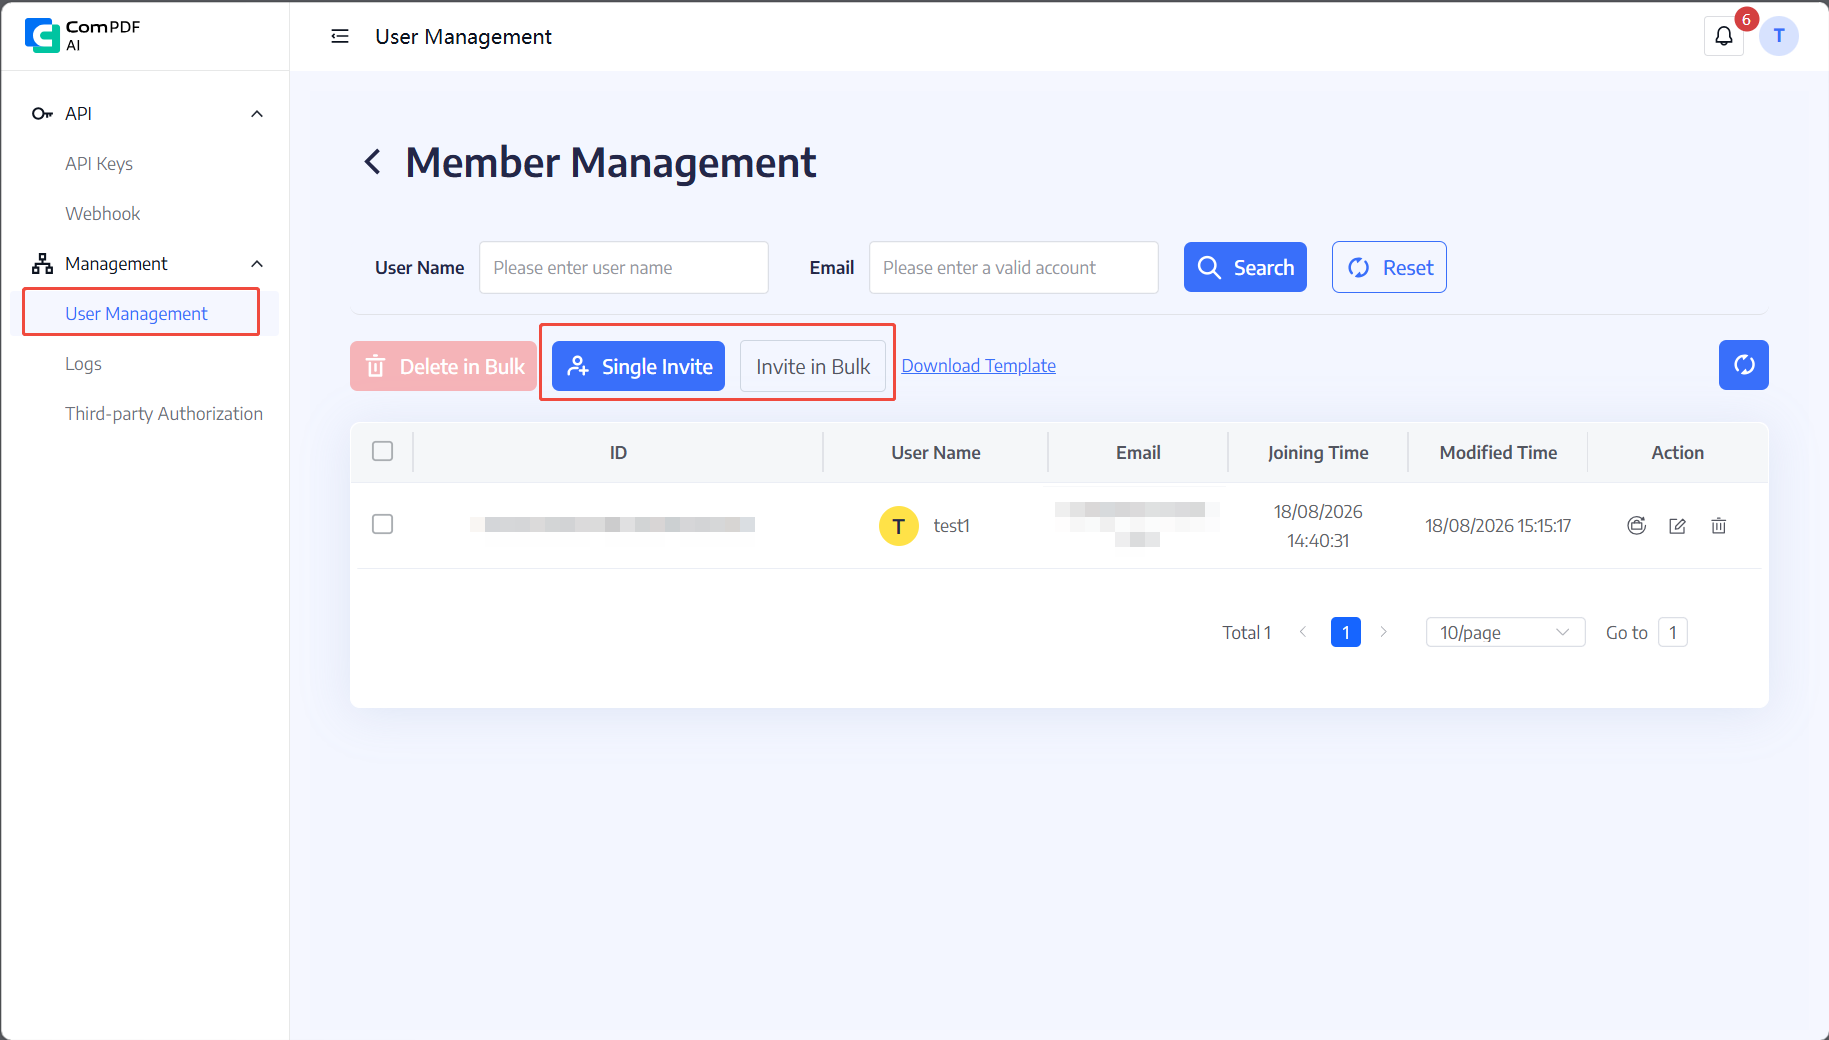
Only administrators can access user management. Select the account icon, choose Admin Console, and open User Management.
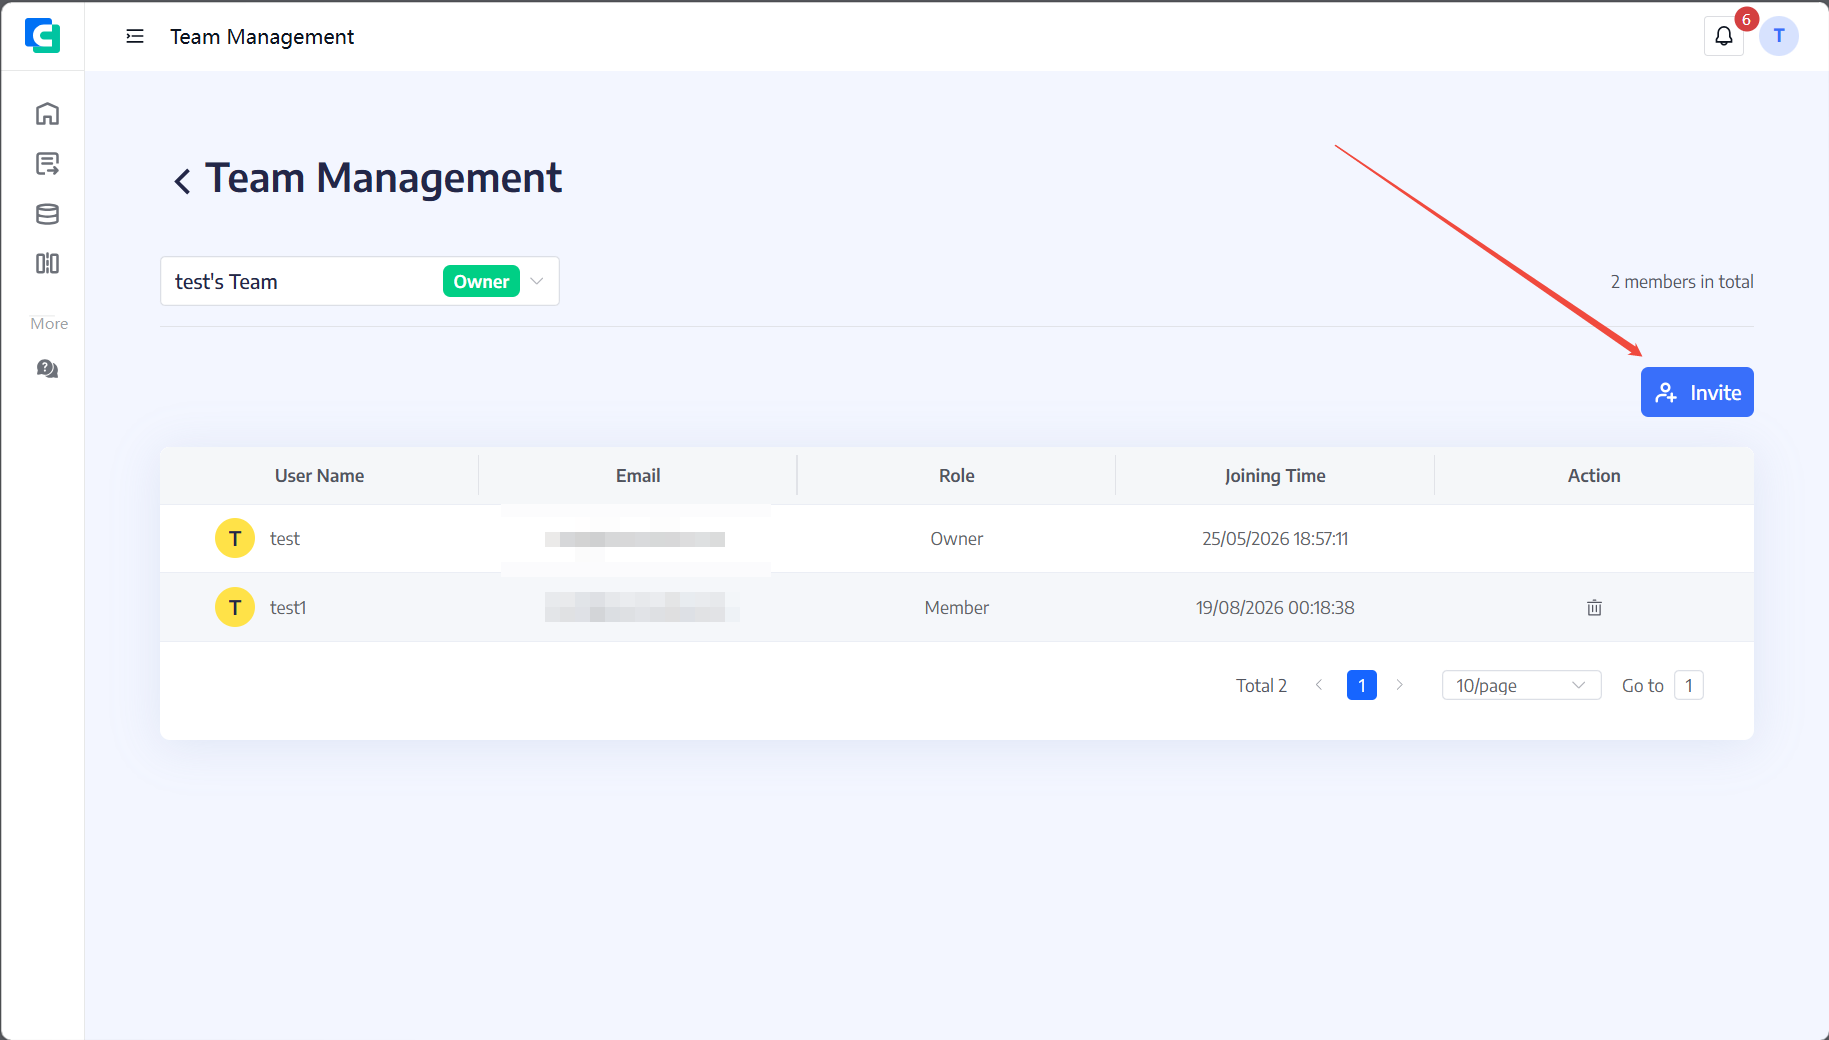
To add a member, choose Invite or Bulk invite, then enter registered member email addresses or upload a list. Administrators can view members, assign roles and permissions, reset passwords, and remove members.
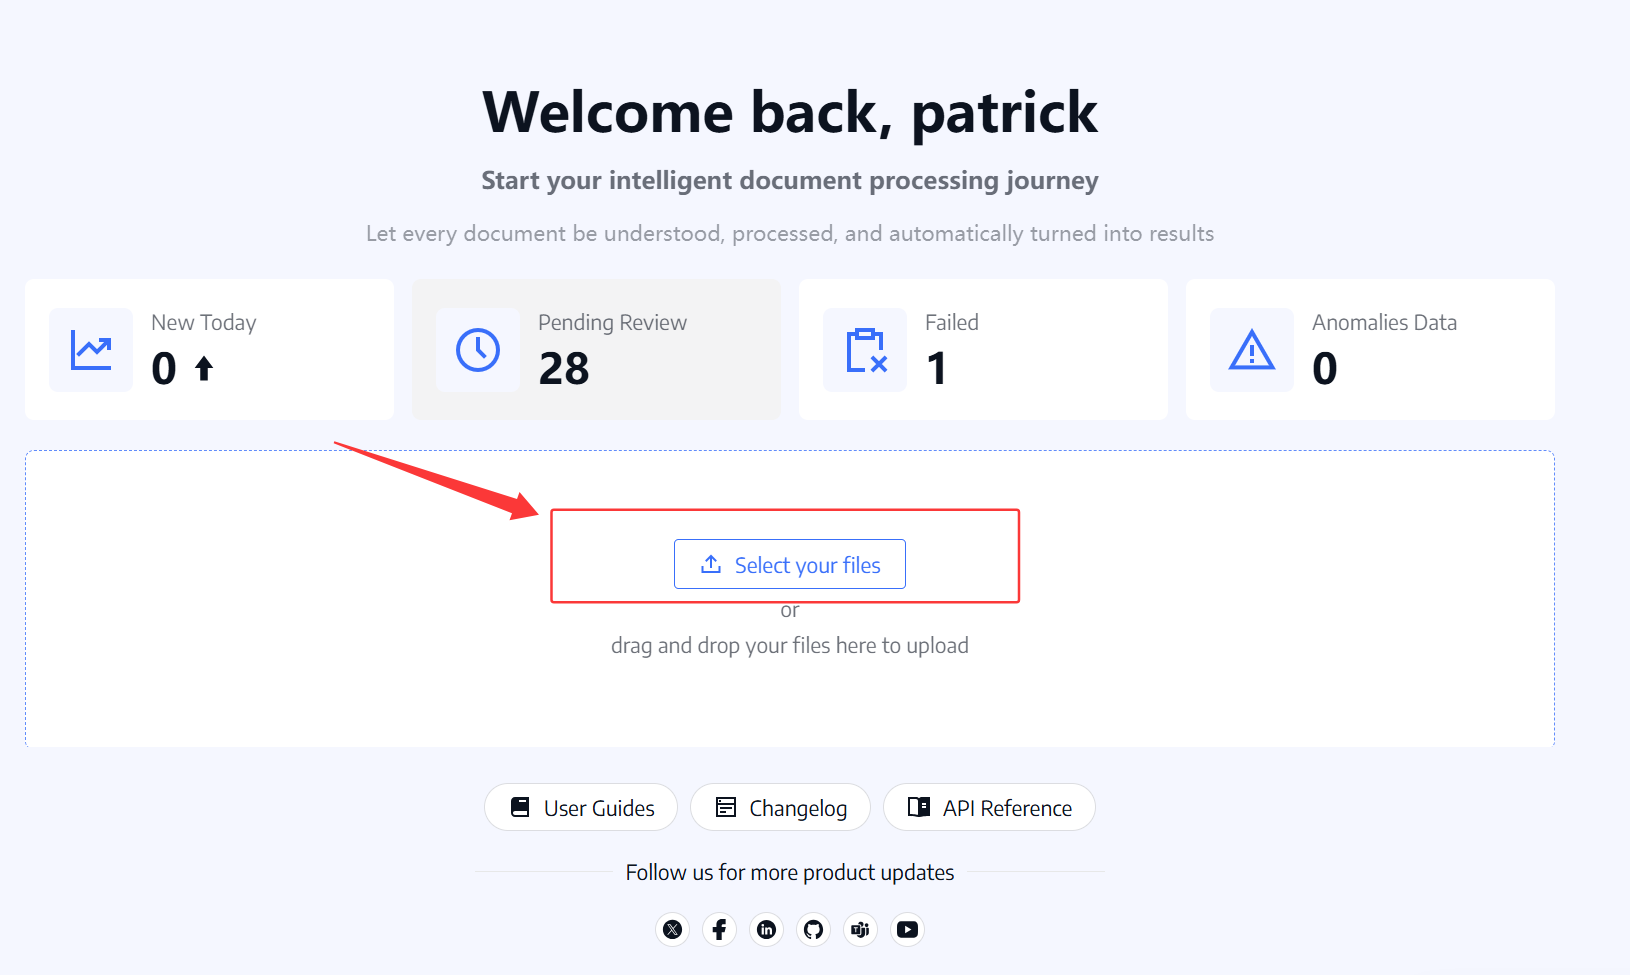
The home dashboard summarizes tasks in the current user's organization scope and provides a quick Upload files entry point.
The overview cards show:
The dashboard refreshes when the page loads. A zero value is valid and the card can still be opened to view an empty list.
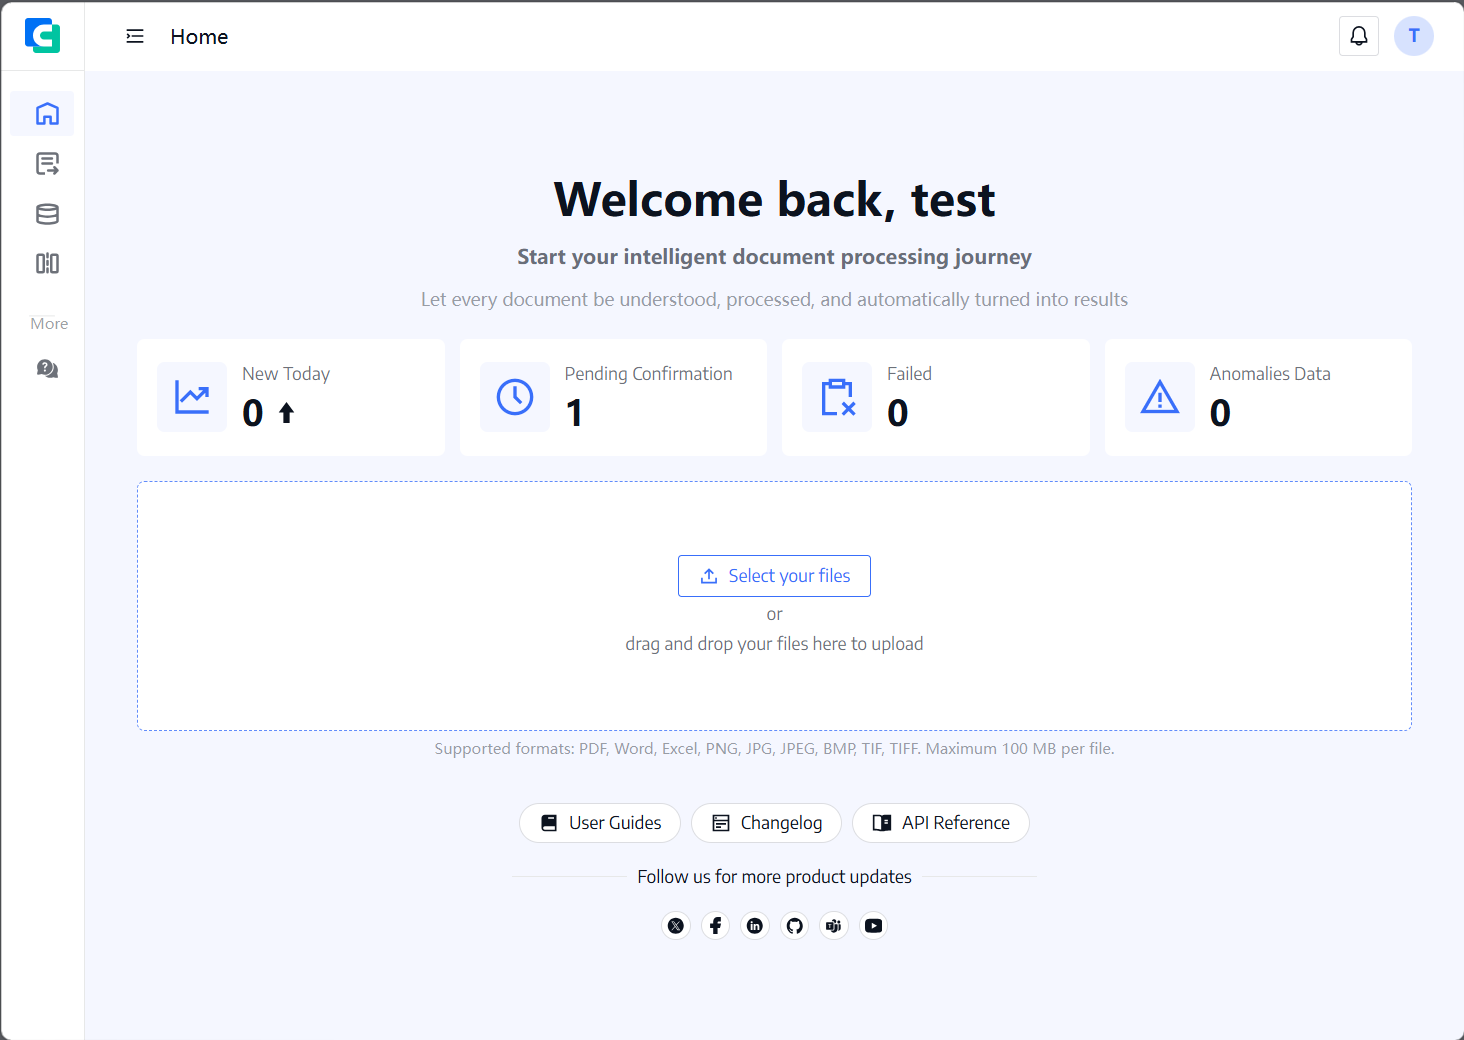
The main quick action is Upload files. It opens the upload dialog, where you choose files and a processing mode; after submission, the system opens the History Files list to show progress.
WorkFlow converts documents into structured JSON, Excel, or CSV data. The normal process is:
Upload -> classify or select a template -> extract -> review -> confirm or export
Supported inputs include PDF, Office documents, images, TXT, and CSV. A single file can be up to 100 MB and a batch can contain up to 32 files.
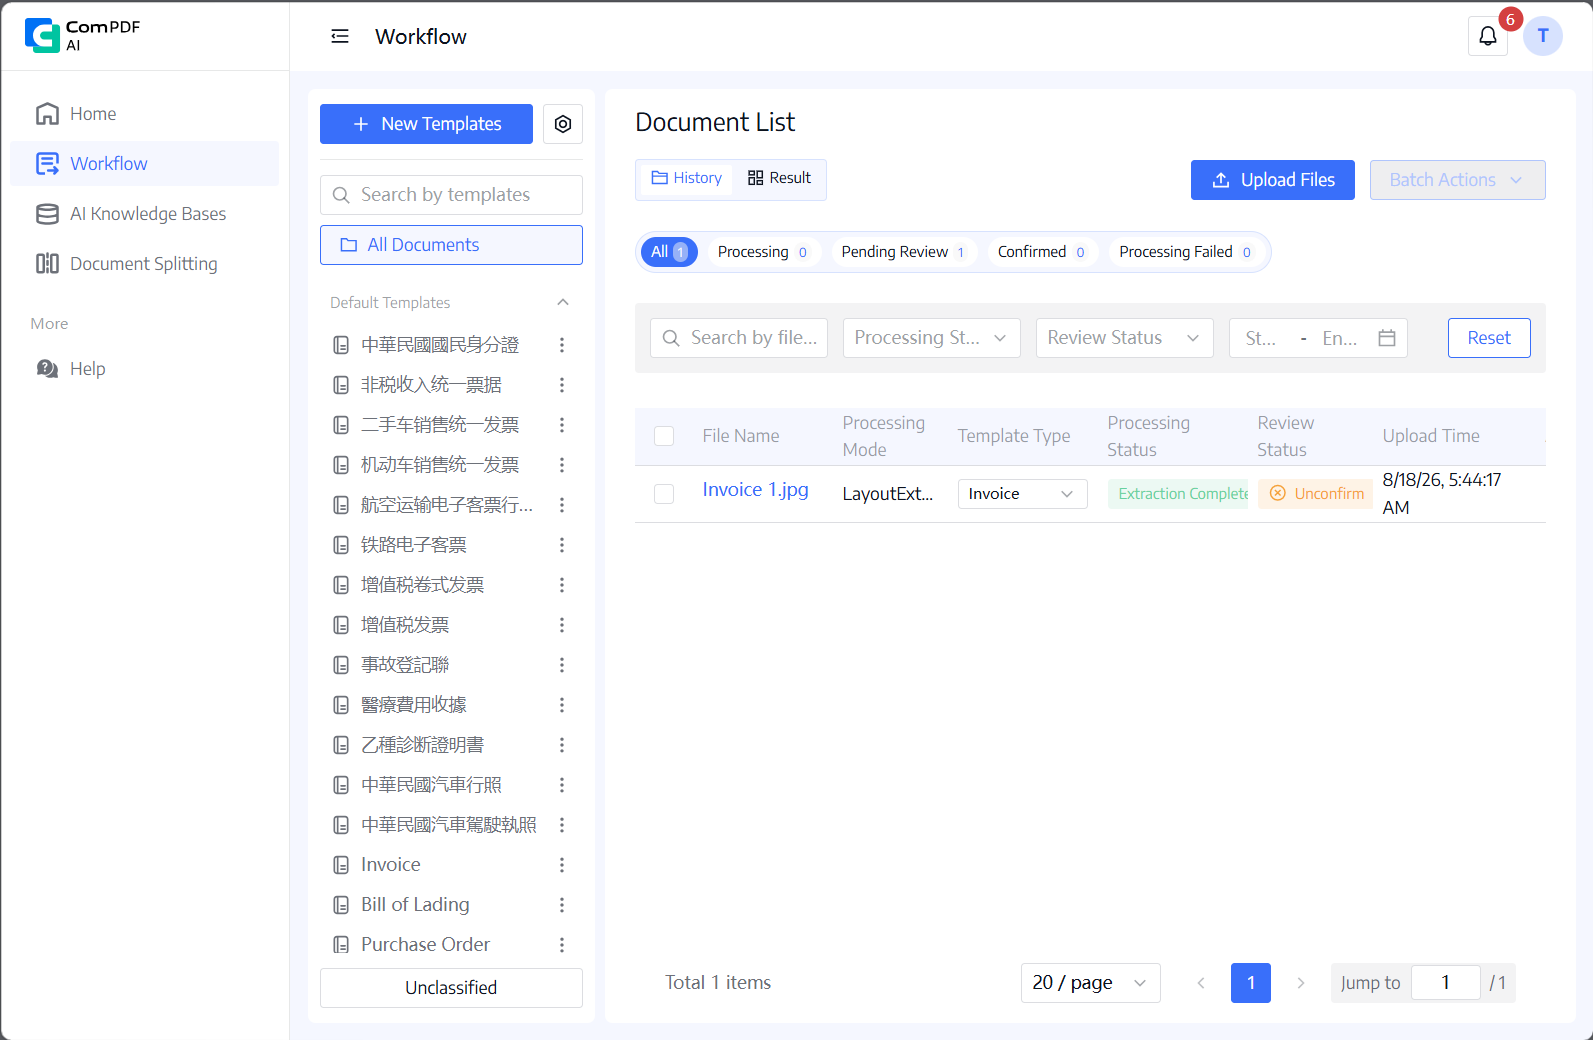
Templates define the fields and extraction rules for a document type. Open Intelligent Document Extraction -> Template Settings.
Click New template, upload one or more sample files, enter a template name, configure fields, and save. Existing templates can be edited or deleted. The template ID can be copied for API use.
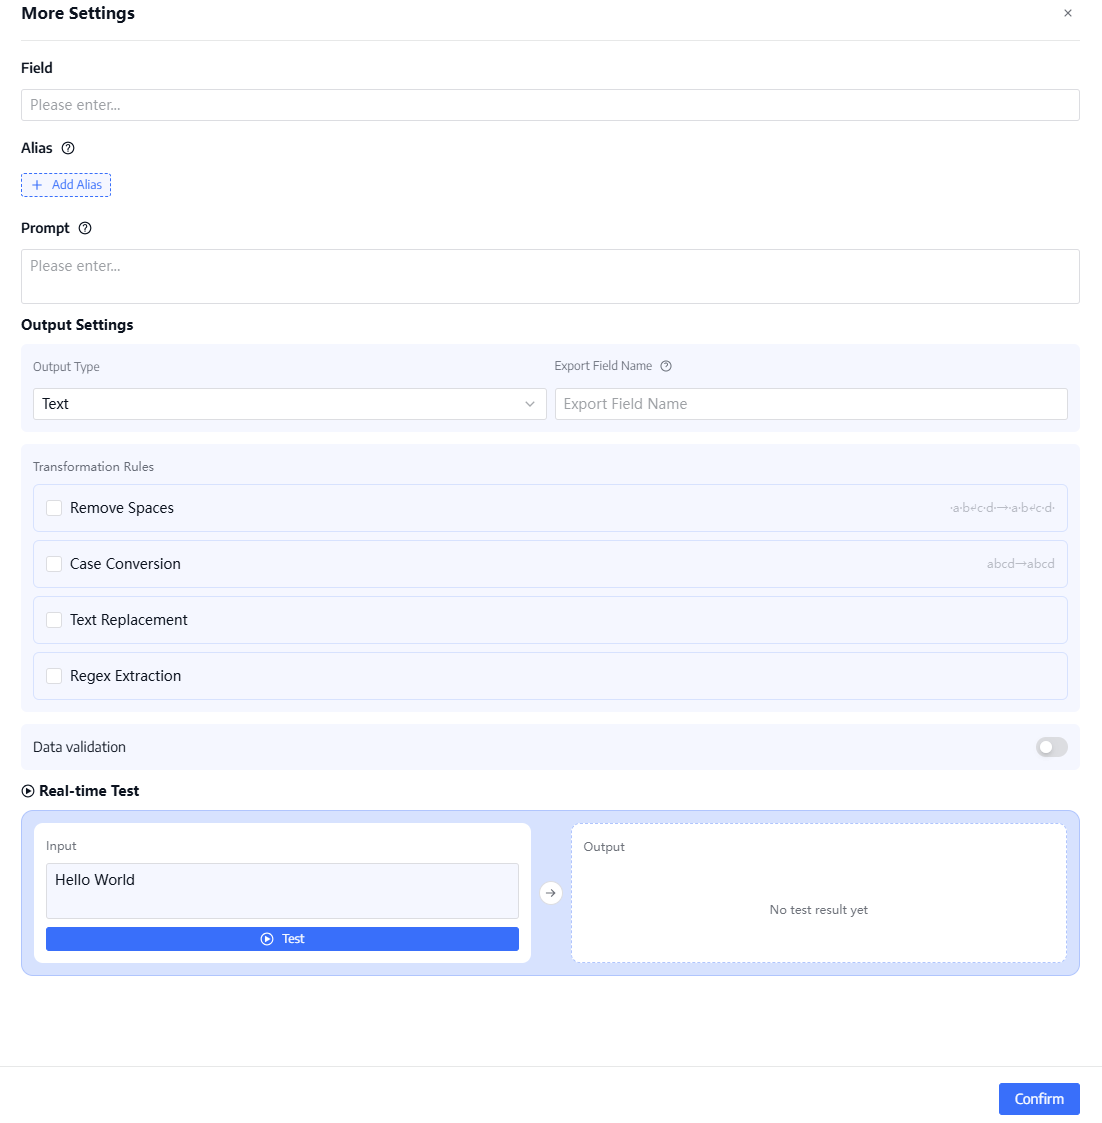
For each field, configure the following information:
| Setting | Description | Required |
|---|---|---|
| Field name | The displayed name used to identify extracted content. | Yes |
| Prompt | An instruction that guides extraction. For example: “Extract the total amount without a currency symbol.” | No |
Prompts can significantly improve extraction accuracy. They guide the model to locate and extract the intended information, especially when formats vary or fields are easily confused.
Output configuration controls the exported field name, type conversion, formatting, and validation. Supported output types include number, text, date, and enumeration. You can test a configuration with sample values before saving.
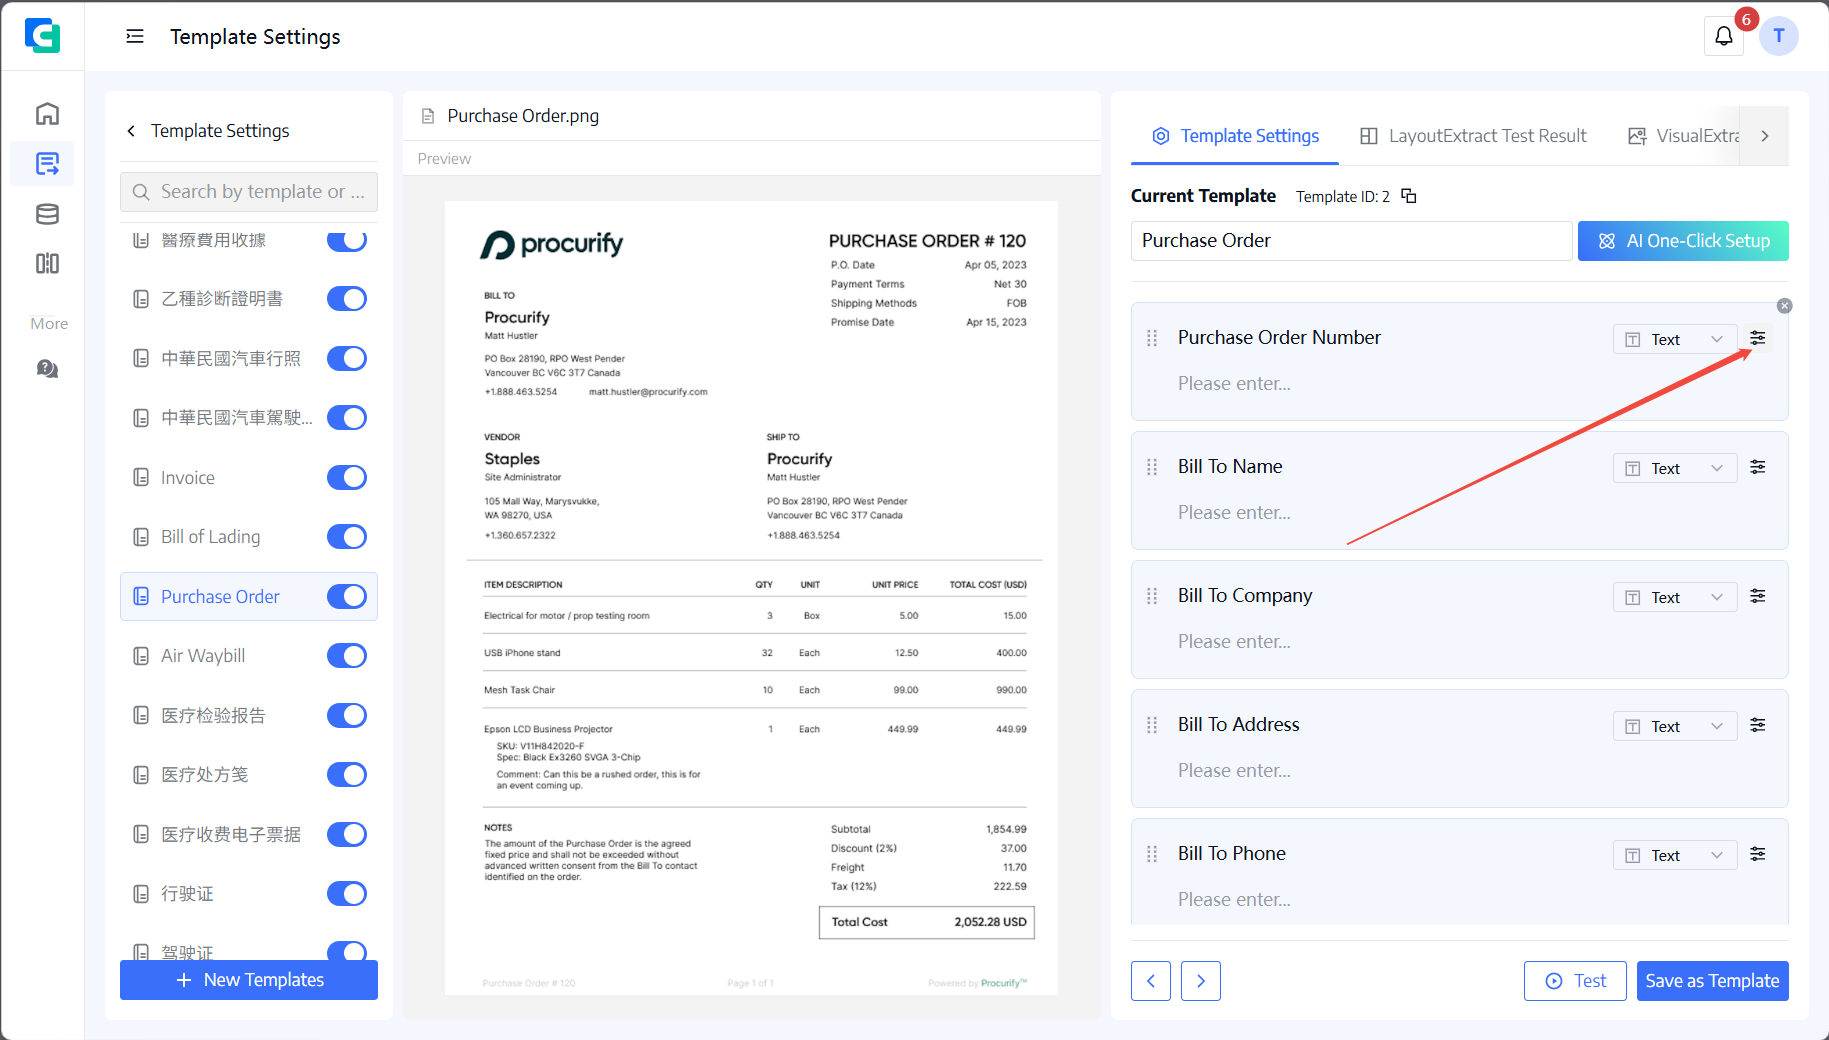
Path: in the template editor, click More settings at the end of a field row.
Output configuration also supports an export field name (letters, numbers, and underscores; maximum 64 characters; unique within the template), conversion-failure handling, and validation. Supported validations are required-value checks, format checks for number/text fields, and comparison checks for number/date fields. Use Run Test with a sample raw value to verify a configuration without saving it.
The complete conversion options are:
| Output type | Rules |
|---|---|
| Number | Remove currency symbols such as ¥, $, €, and £; remove thousands separators; retain 0-6 decimal places; omit trailing zeros; and convert units such as thousand, ten thousand, million, or hundred million. |
| Text | Remove leading/trailing or all spaces and line breaks; convert case; replace text in sequence; and extract with regular expressions, including common phone, email, and ID patterns. |
| Date | Recognize common date formats, including date-time values, and normalize output to formats such as YYYY-MM-DD, YYYY/MM/DD, DD/MM/YYYY, or YYYY年MM月DD日. |
| Enumeration | Define a standard value list, map raw extracted values to standard values, and apply mappings in their configured order. |
For failed conversion, choose No processing, Output empty, Output default value, or Mark exception. Validation includes required-value validation for all types, format validation for number/text, and comparison validation for number/date values.
After uploading a sample, click AI configuration to identify fields and generate an initial configuration. Review and edit the generated result before saving.
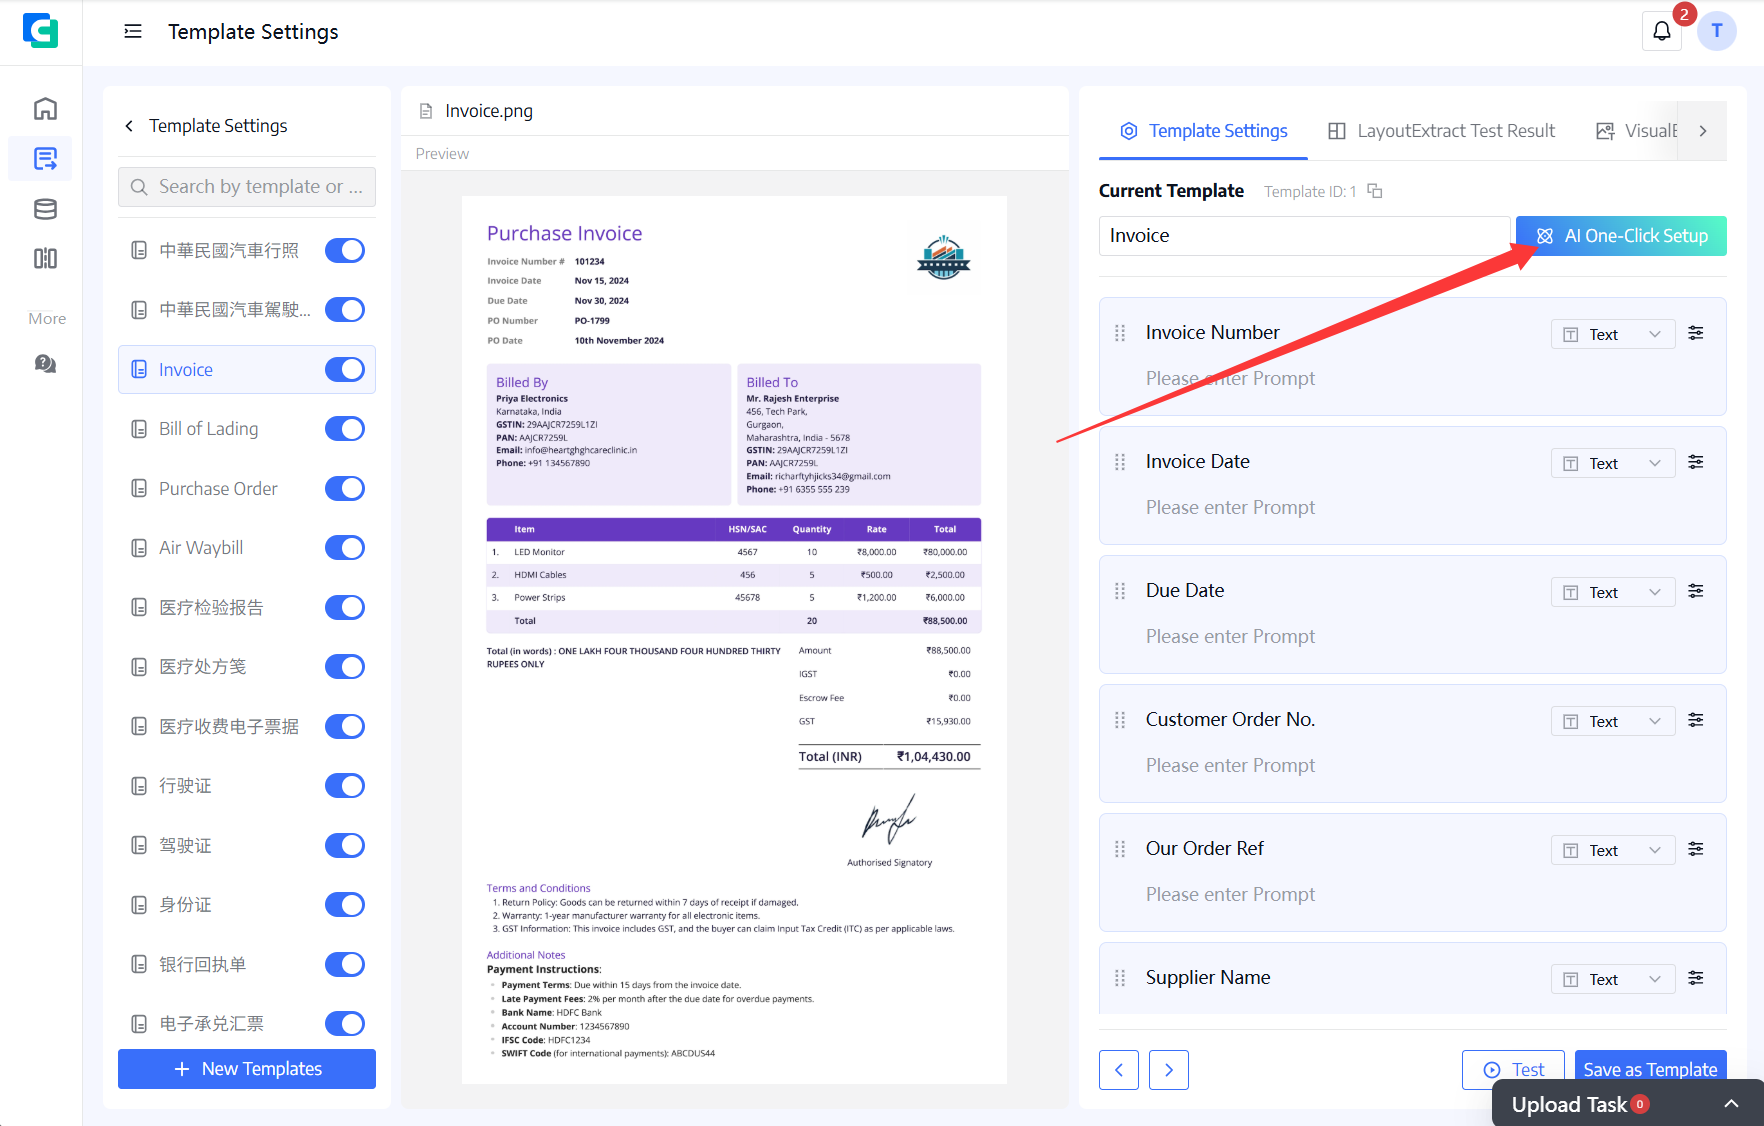
ComPDF AI includes default templates for common invoices, orders, contracts, and other business documents. Default templates can be used directly; create a custom template when additional fields or rules are required.
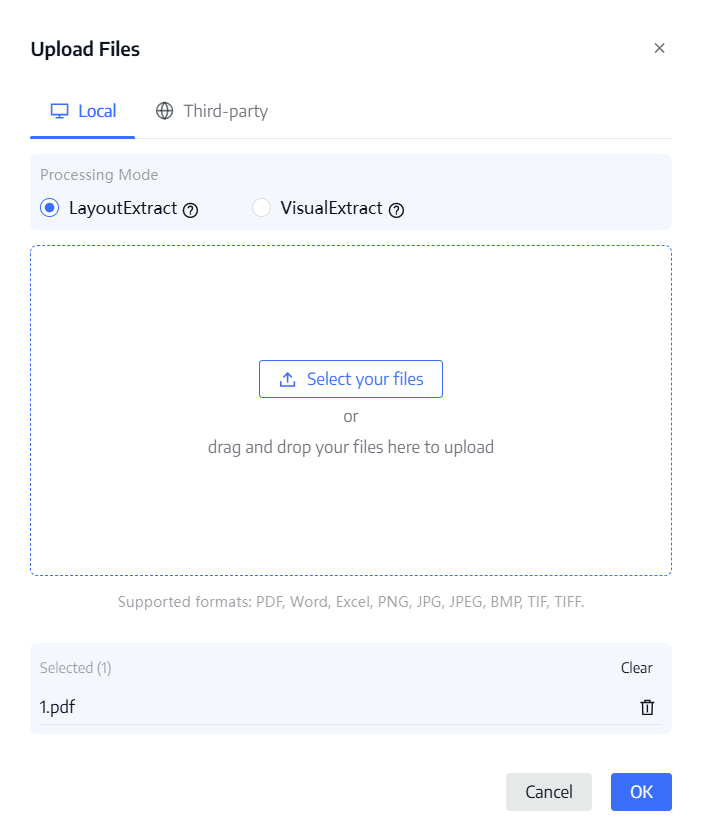
Click Upload files from the WorkFlow page or the home dashboard. Drag files into the upload dialog or select them from the local file system, then choose a processing mode.
The processing mode cannot be changed after upload; upload the file again to use another mode.
After upload, the selected mode creates an asynchronous processing task. Asset quota is reserved from estimated page count, settled against actual pages after success, and released when a task fails or is cancelled. One failed file does not interrupt the remaining files in a batch.
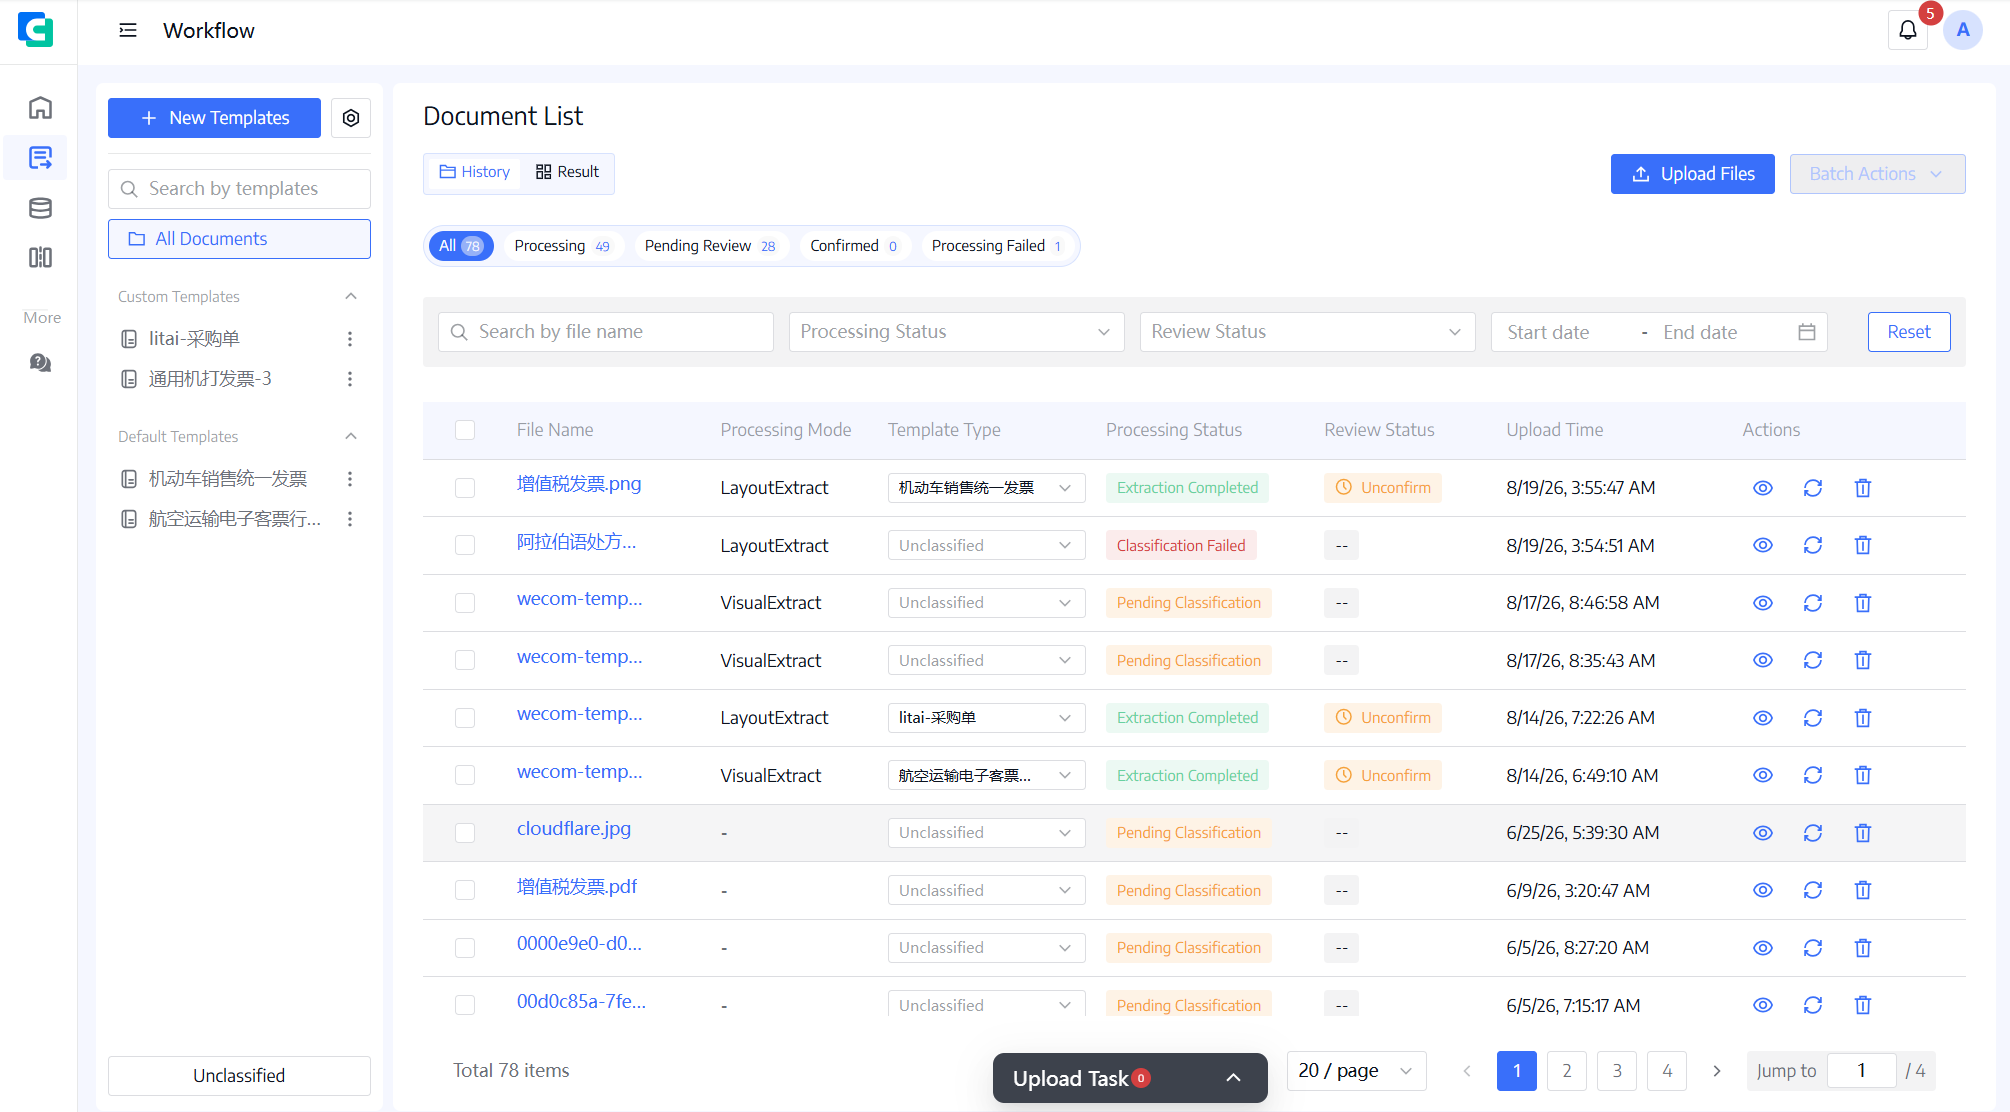
The history list shows file name, template, mode, processing status, and review status.
| Field | Description |
|---|---|
| File name | Name of the uploaded file. |
| Template name | Template associated with the file. |
| Processing mode | LayoutExtract or VisualExtract. |
| Processing status | Pending parsing, parsing, parsing completed, pending classification, classifying, pending extraction, extracting, extraction completed, parsing failed, classification failed, or extraction failed. |
| Review status | Pending or confirmed. Displayed after extraction completes. |
Available actions depend on the processing status: open details, remove a file, retry a failed file using its original mode, change classification and re-extract, or re-run extraction for a completed file.
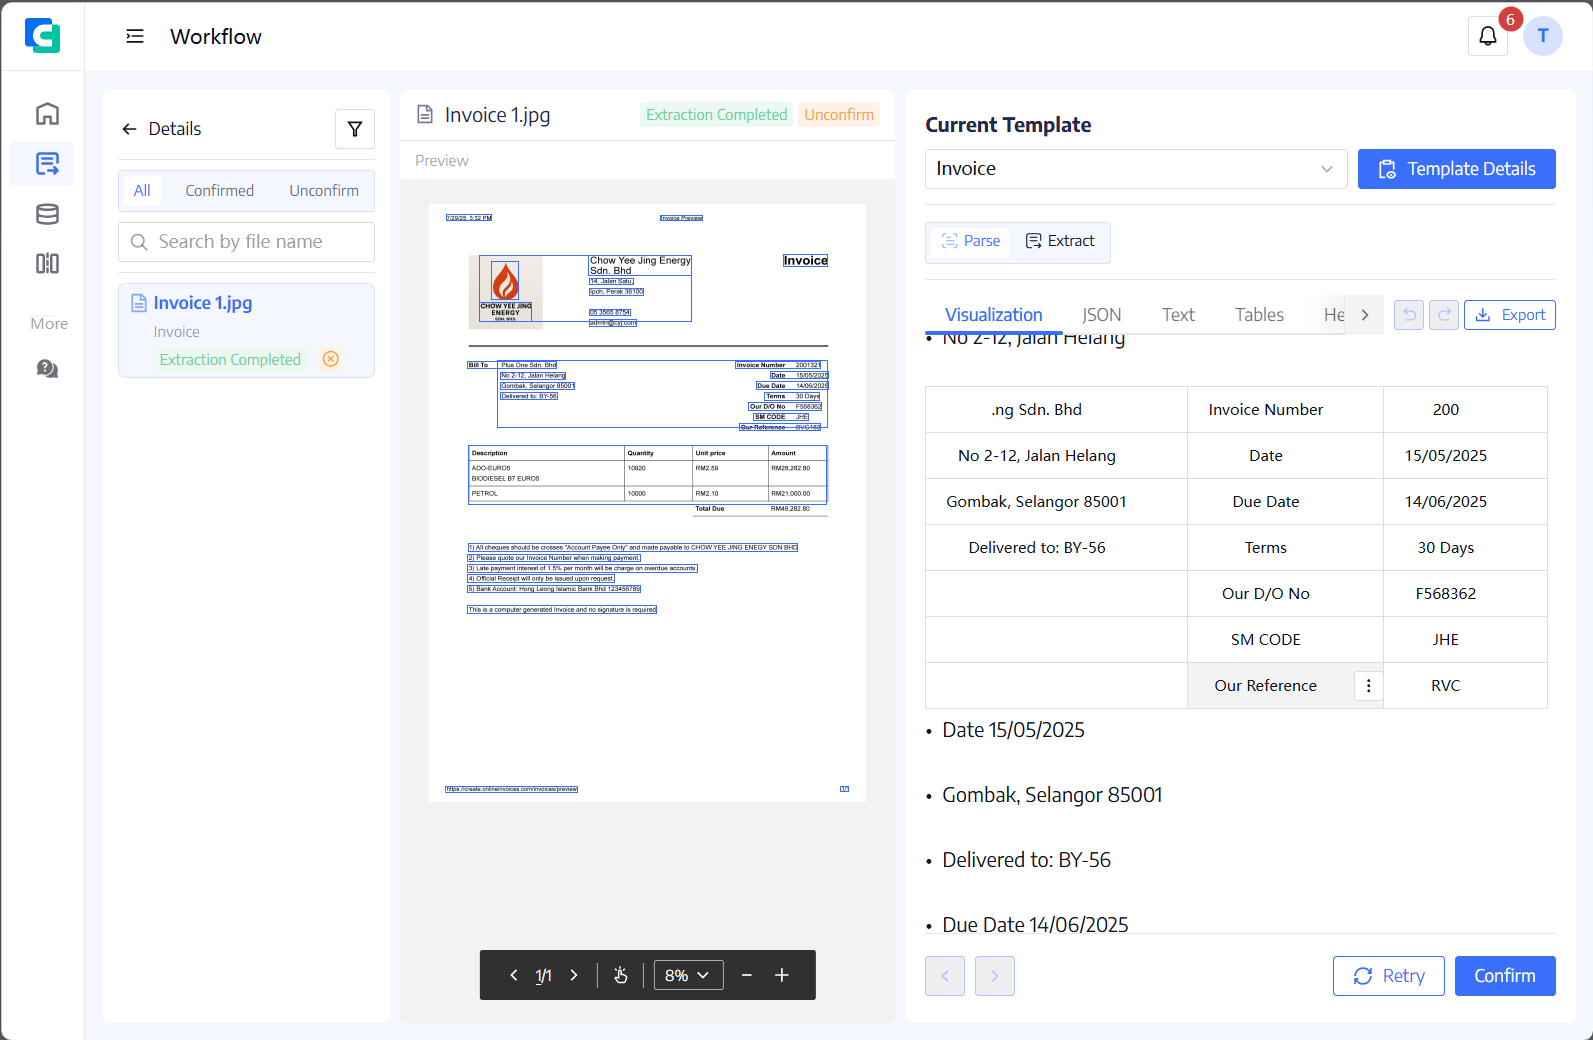
Open a file from the history list to view the source document and extraction result.
| Area | Content |
|---|---|
| Left sidebar | Files under the current template; supports file-name search and switching files. |
| Center | PDF preview with zoom, page navigation, and bidirectional anchor positioning. |
| Right | Result tabs for layout and extraction results. |
Layout results are available only for LayoutExtract. Extraction results are available for both modes. Before confirmation, fields can be corrected and results can be downloaded as JSON, Excel, or CSV.
| Action | Condition | Result |
|---|---|---|
| Confirm | Review status is Pending and the user clicks Confirm. | Review status becomes Confirmed, results become read-only, and confirmer/time are recorded. |
| Revoke confirmation | Review status is Confirmed and the user clicks Revoke confirmation. | Enter a required reason of up to 200 characters; review returns to Pending and results become editable. |
The results dashboard presents extraction results in a table and supports column configuration, search, template filters, and exception filters.
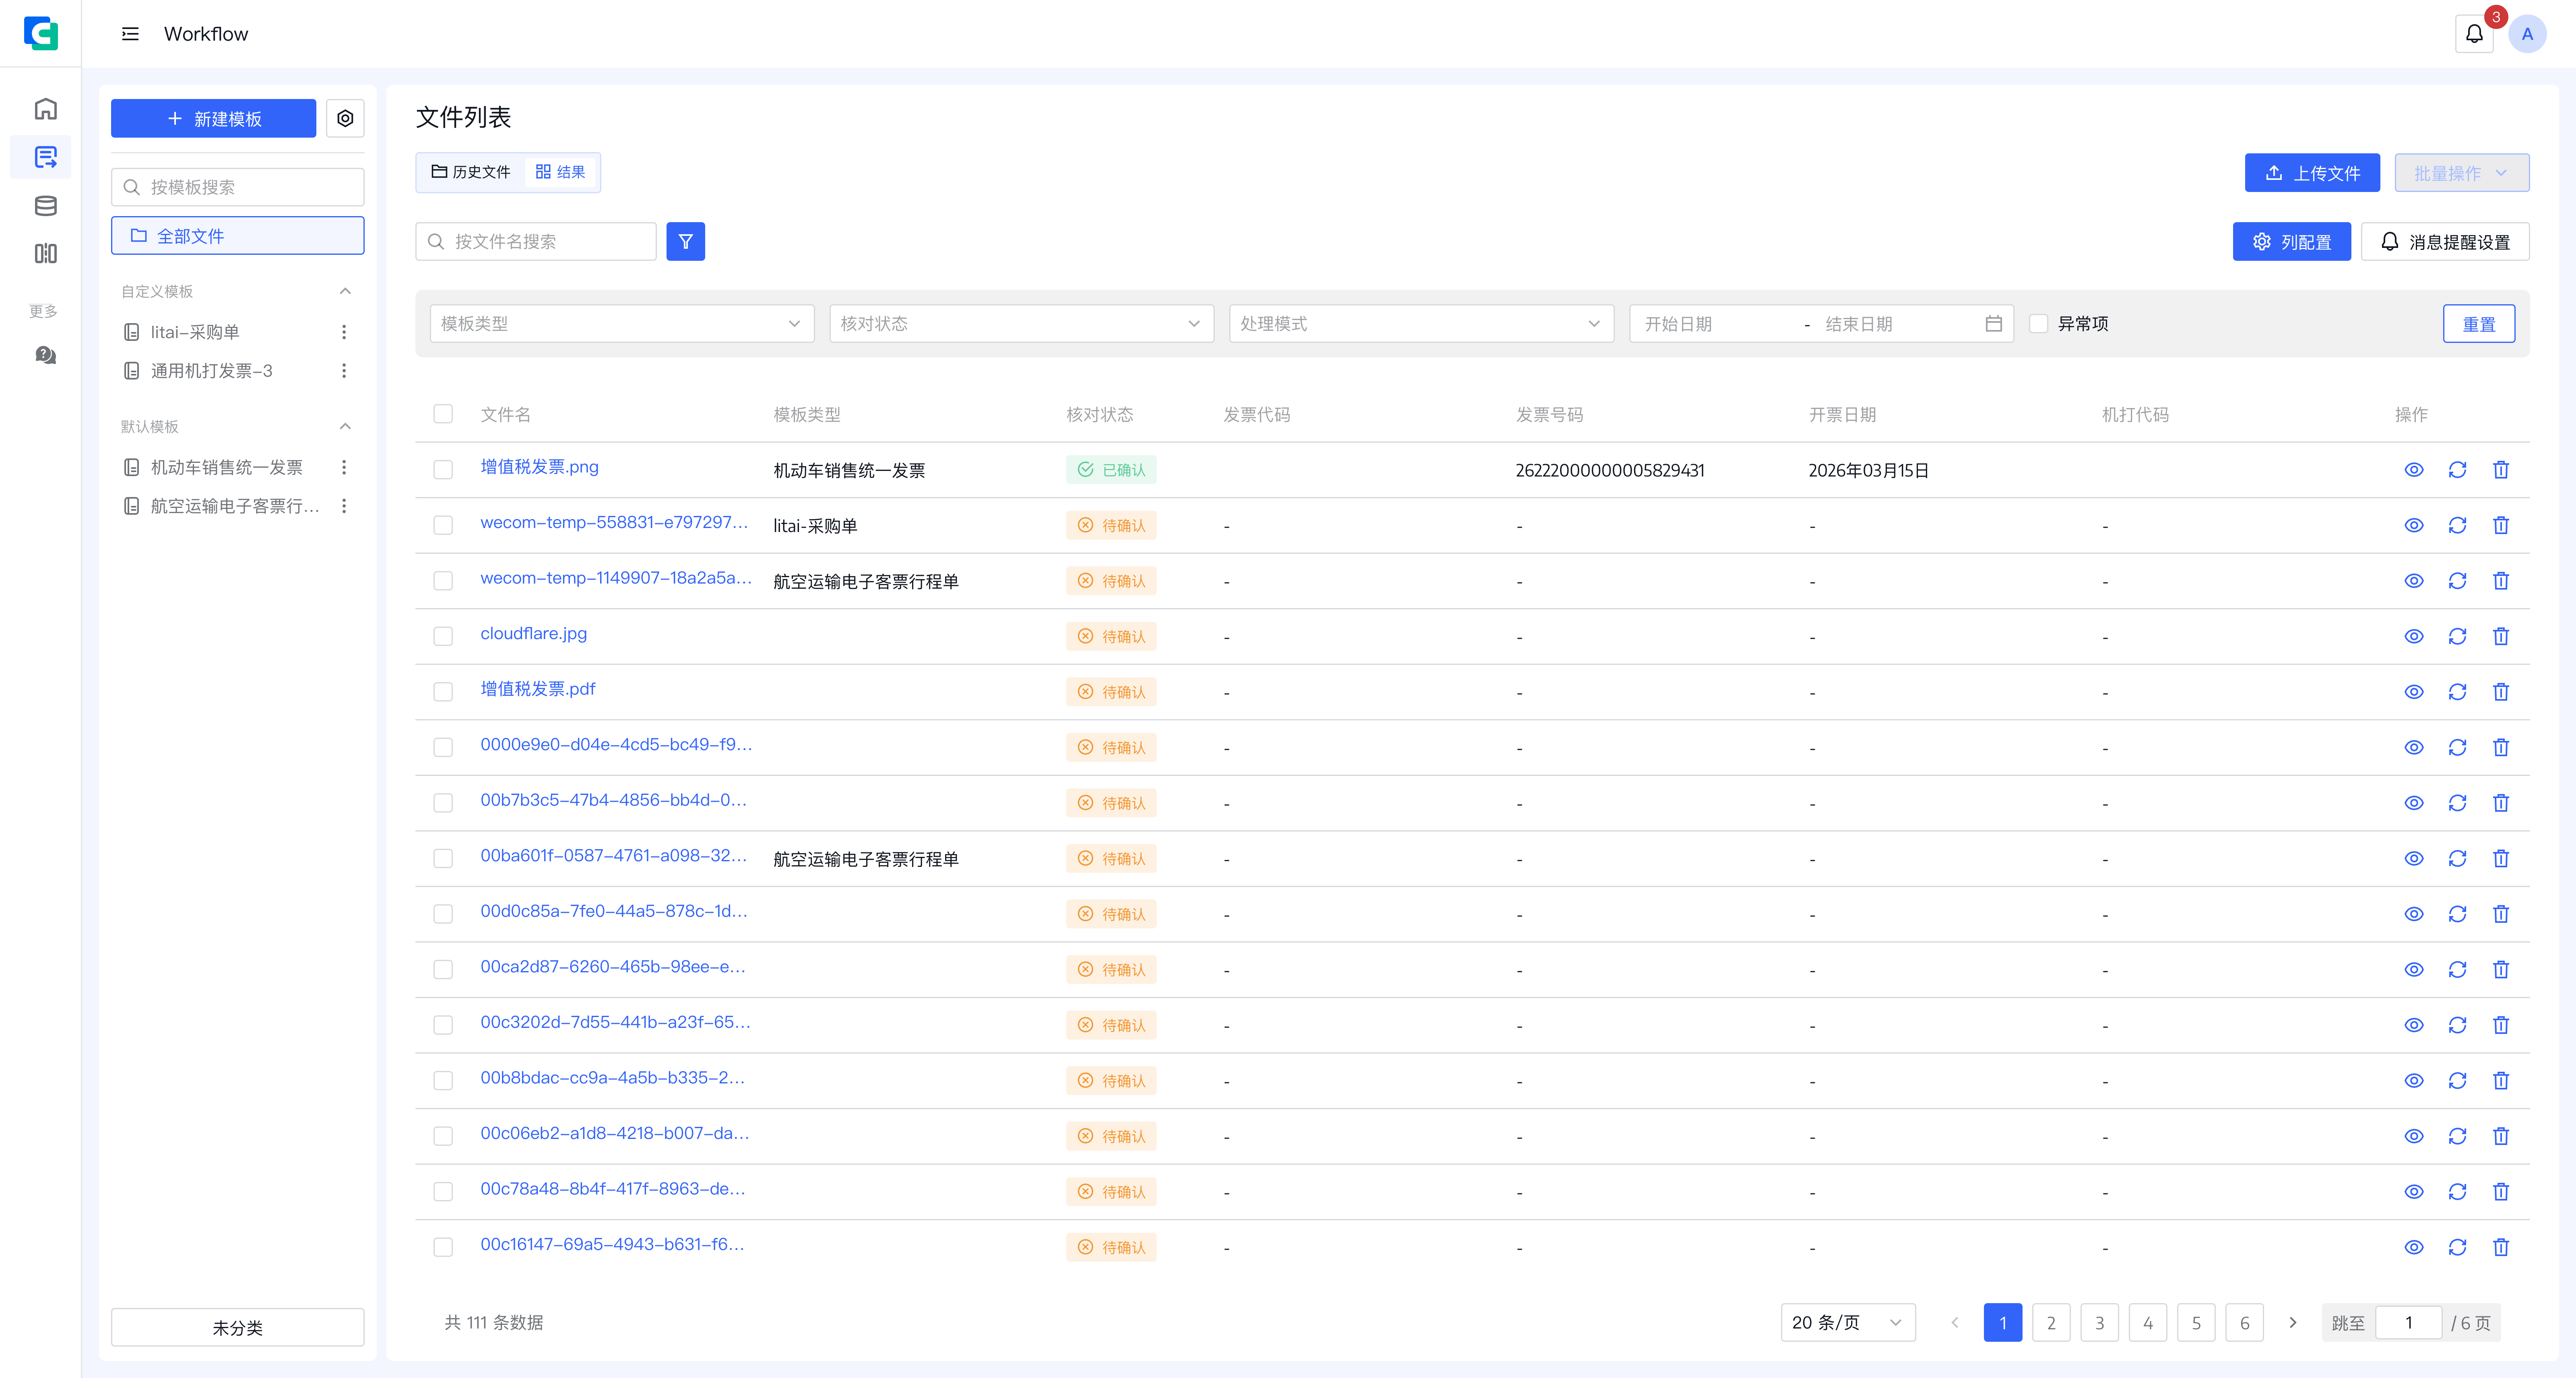
Compare the result with the source document and click Confirm when the result is correct. Confirmed results become read-only. Use Revoke confirmation and provide a reason to edit the result again.
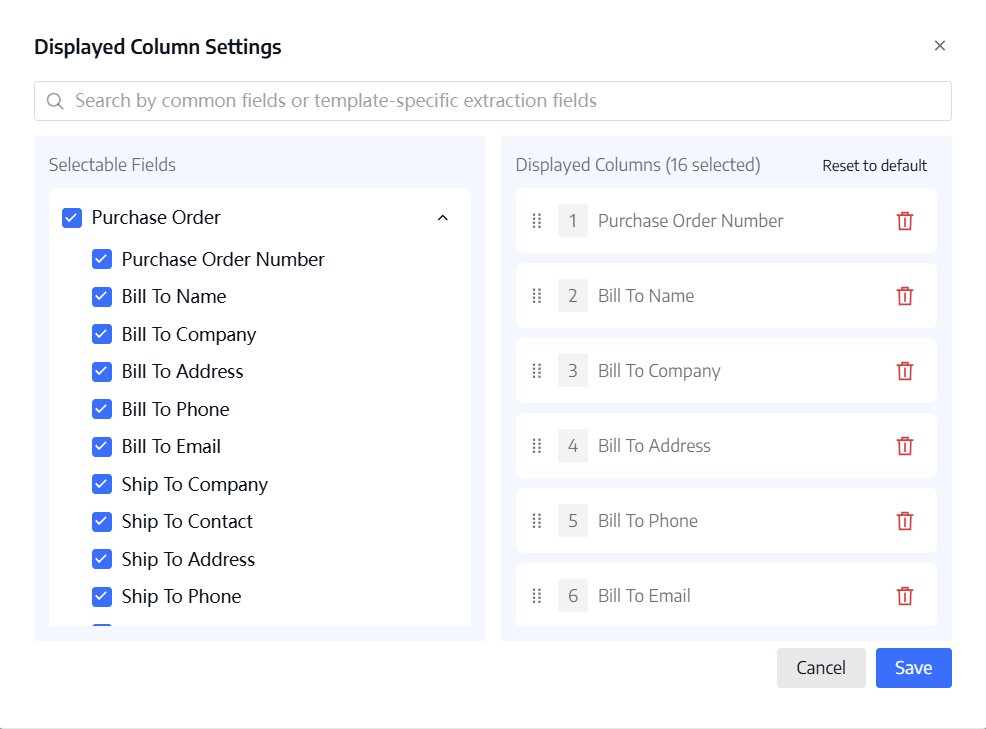
Use column configuration to select and reorder the text fields displayed in the dashboard. Available fields are grouped by template and shown by export field name. Under All Files, fields with the same name across templates are merged; under a selected template, only that template's text fields are shown.
The service validates fields when extraction completes and when a result is saved. Invalid fields are shown with a red background, red border, and warning marker.
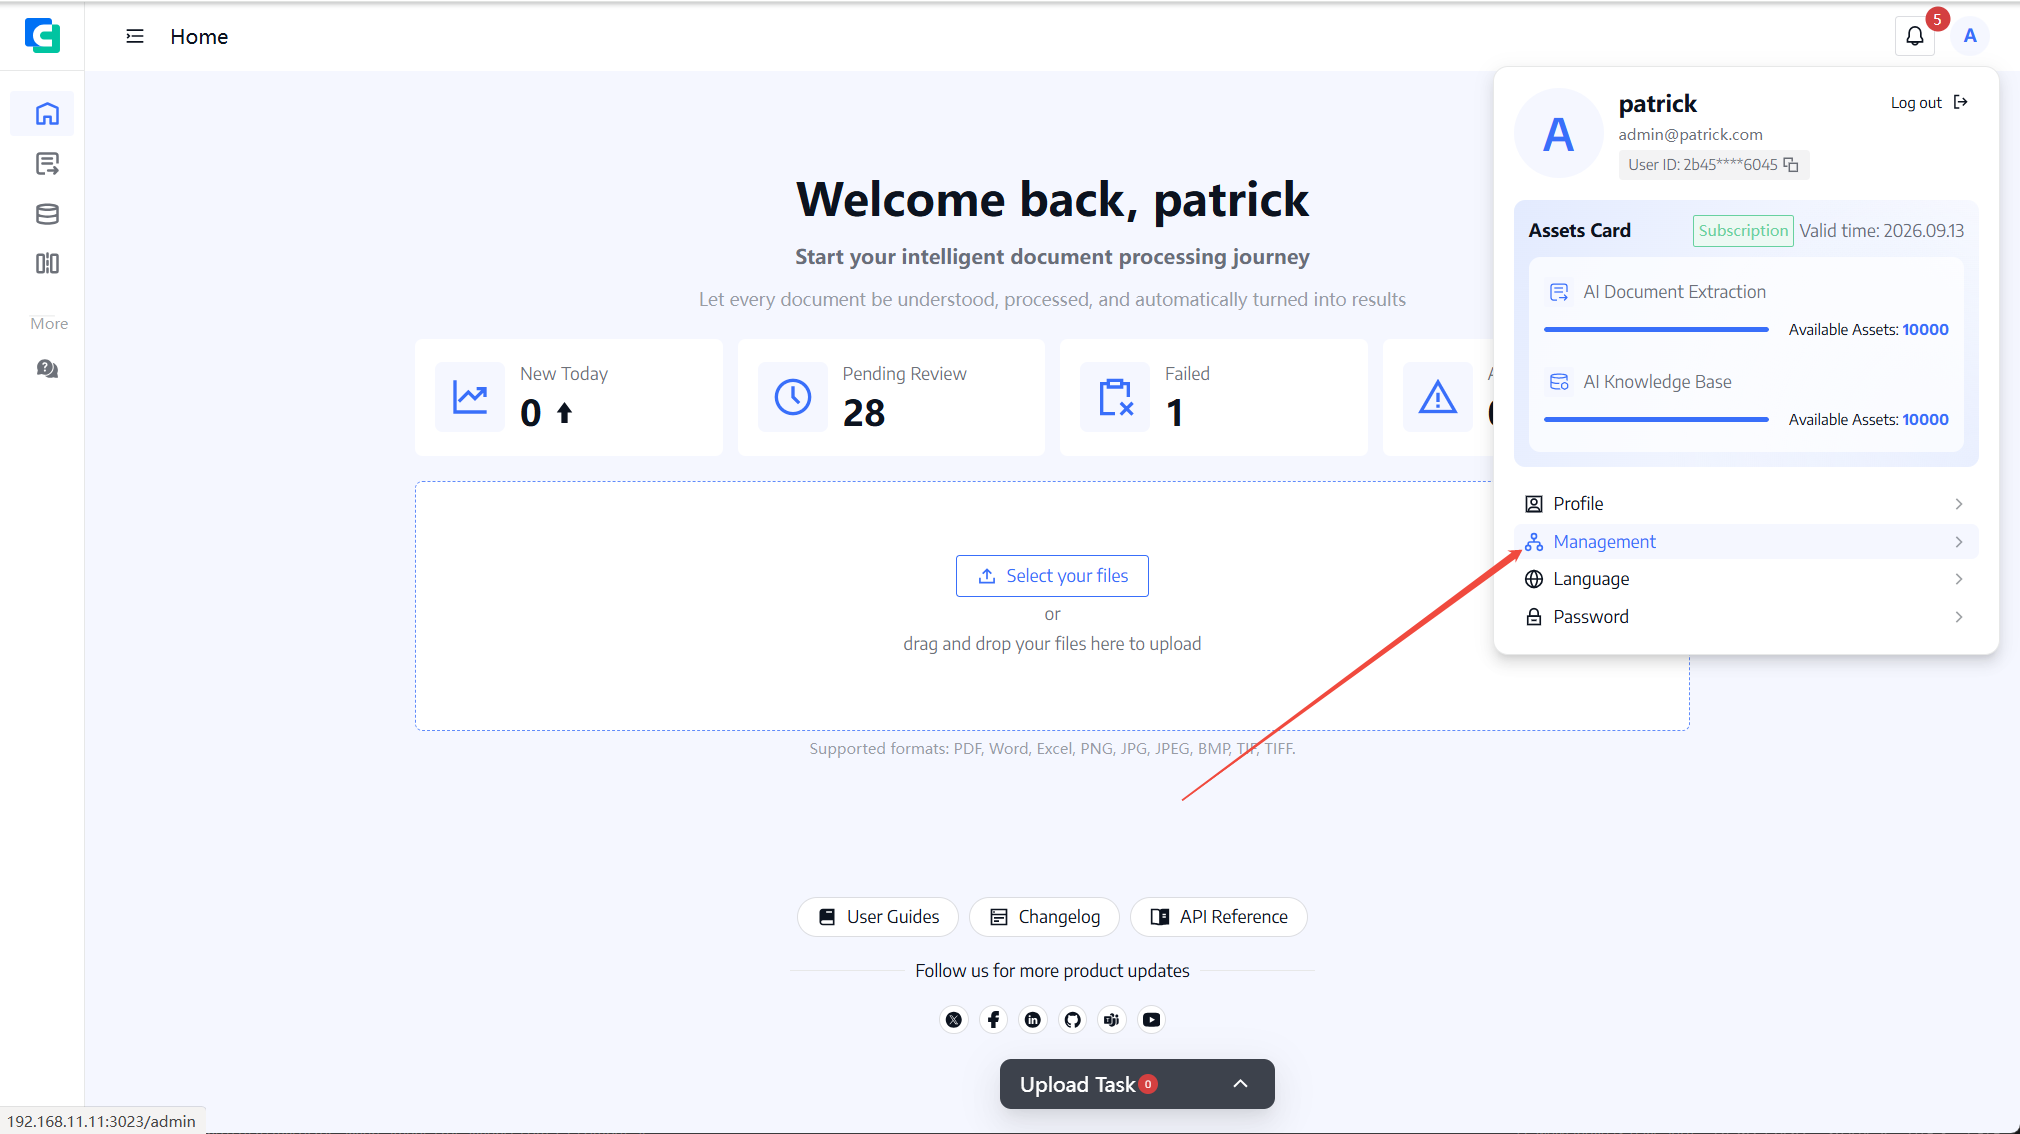
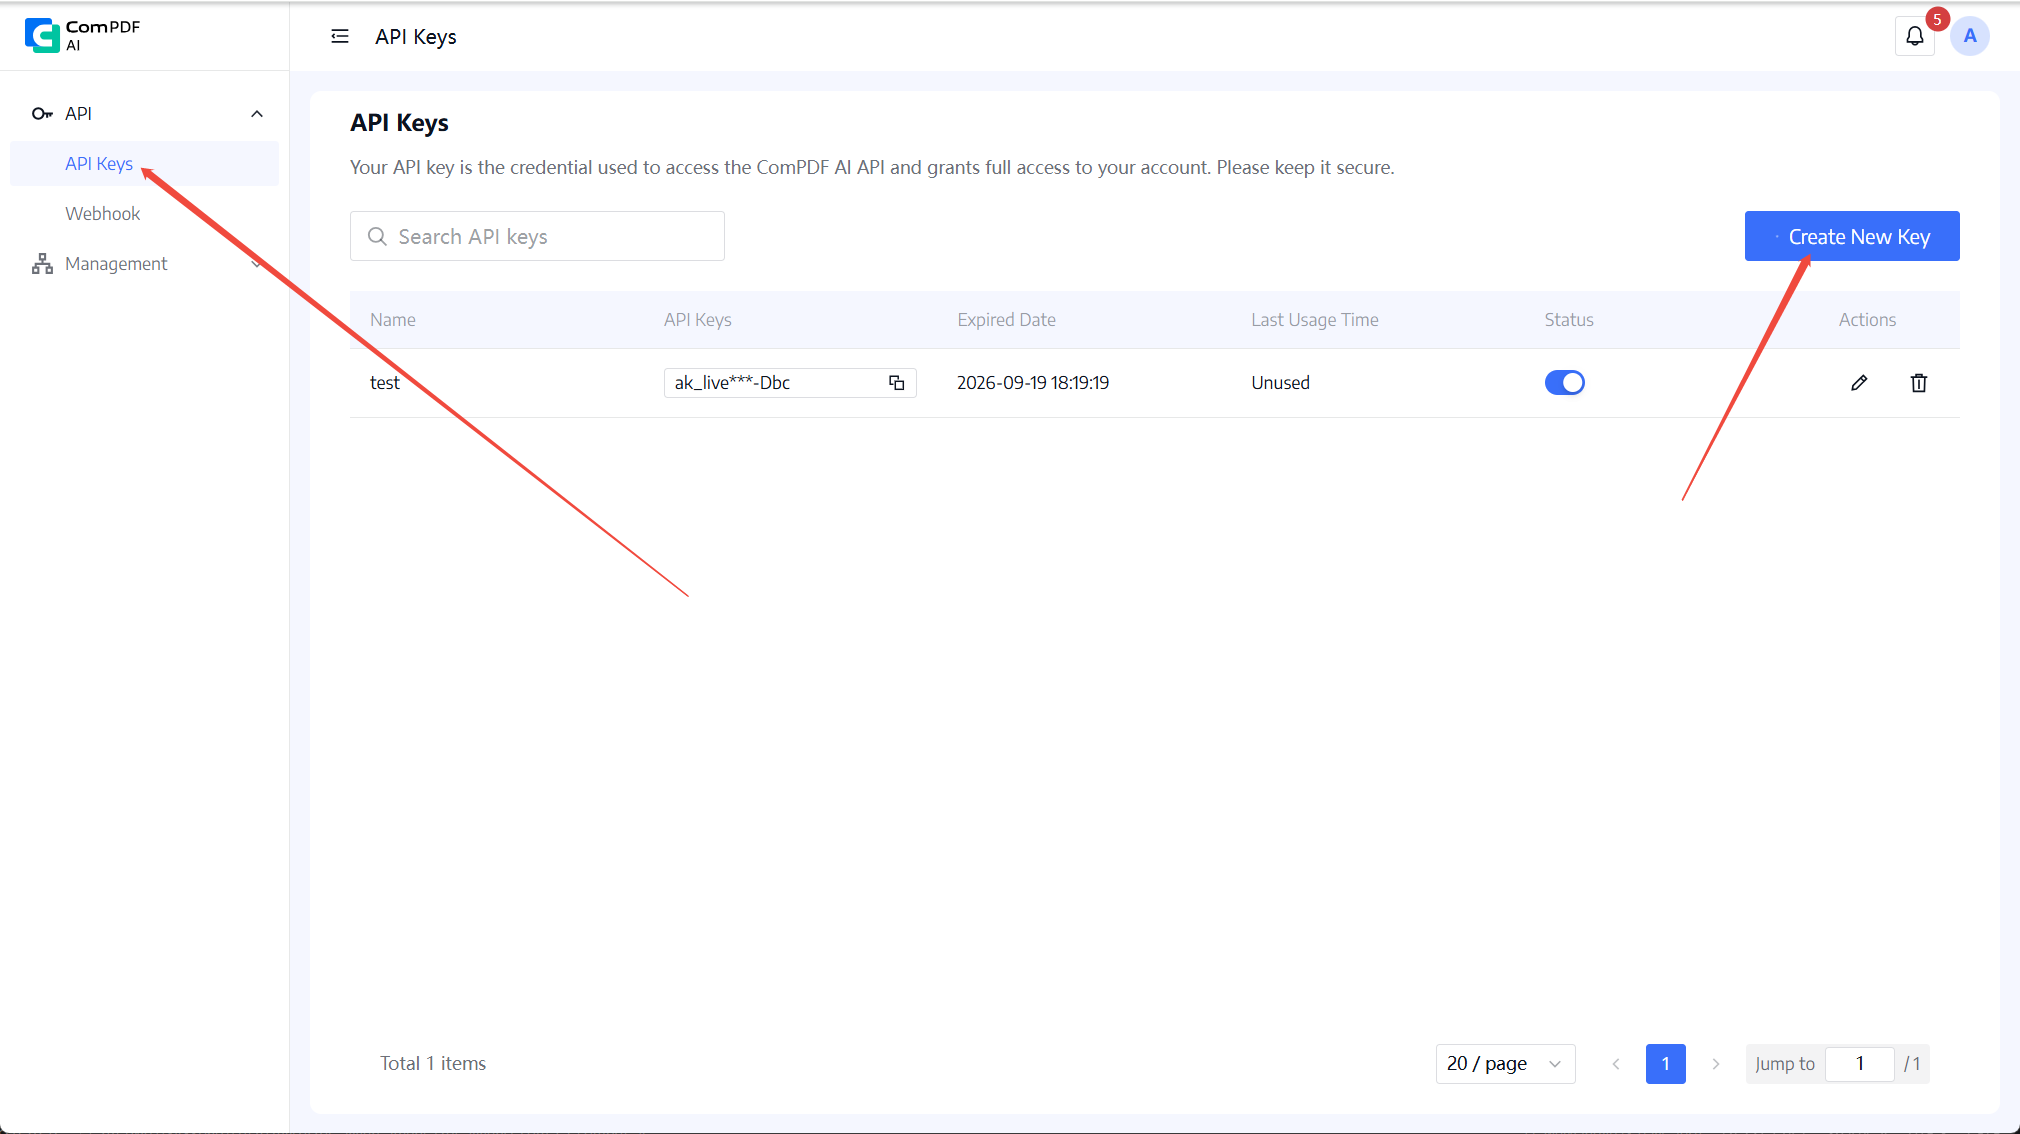
Open the account menu, choose Admin Console, and open the API section. API Keys are used by external services; Webhooks deliver asynchronous events to a business endpoint.
Use the key in API requests as follows:
Authorization: Bearer <YOUR_API_KEY>The list only displays a masked key. Never place a complete key in browser code, public repositories, screenshots, or logs. Disable or delete a leaked key and create a replacement.
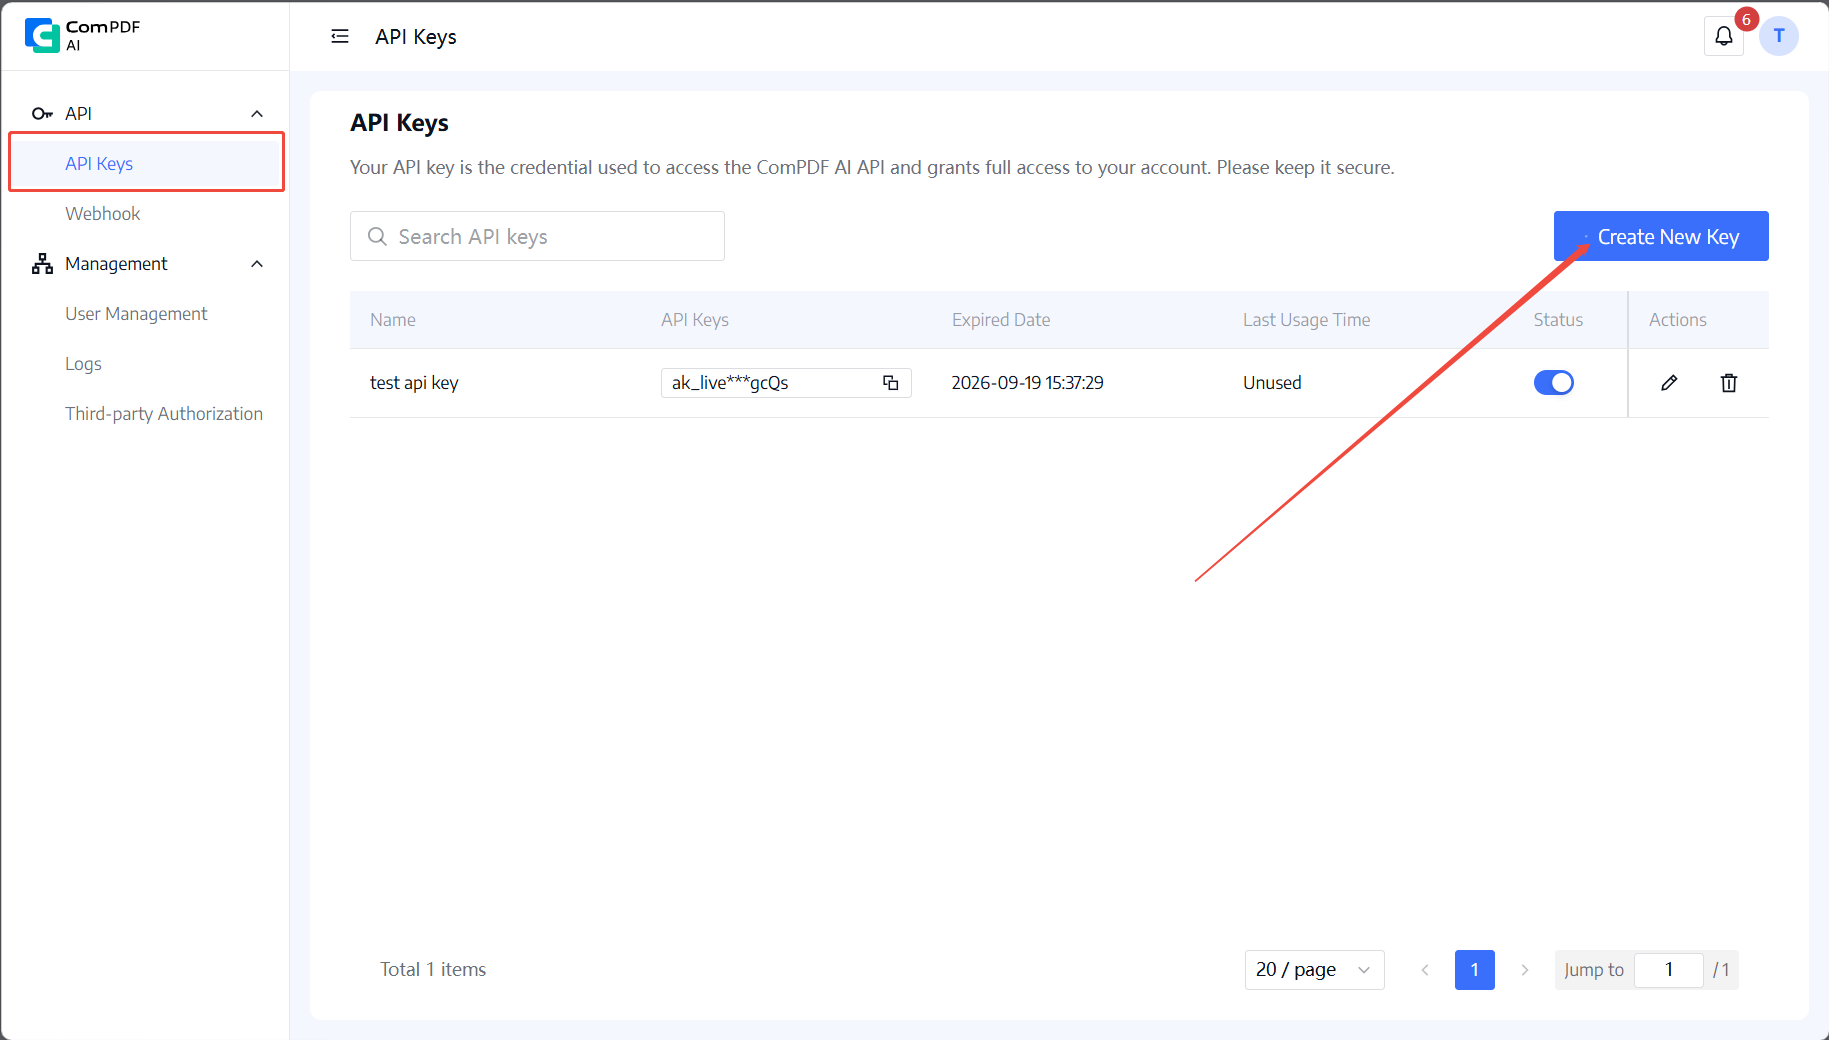
Use the status switch to enable or disable a key. An expired key cannot be enabled. Delete a key only after confirming the action; deletion is permanent. The list displays a masked key only; do not place plaintext keys in browser code, repositories, screenshots, or logs. Disable or delete a leaked key and create a replacement.
The receiver must verify the X-ComPDF-Signature header. A Webhook used by a reminder rule must be enabled and subscribed to the rule_triggered event. Failed deliveries are recorded and retried according to the service policy.

Use the status switch to enable or disable a Webhook; the page displays the operation result. To delete a Webhook, click the delete icon and confirm. Deletion is permanent.
Every Webhook receives a unique signing secret of at least 32 characters. ComPDF AI sends a JSON HTTP POST request when a subscribed event occurs. The receiver must verify the X-ComPDF-Signature request header to confirm the callback source. Delivery timeout is 5 seconds; failed deliveries are retried every 5 minutes, up to three times. The most recent HTTP response code is retained for display.
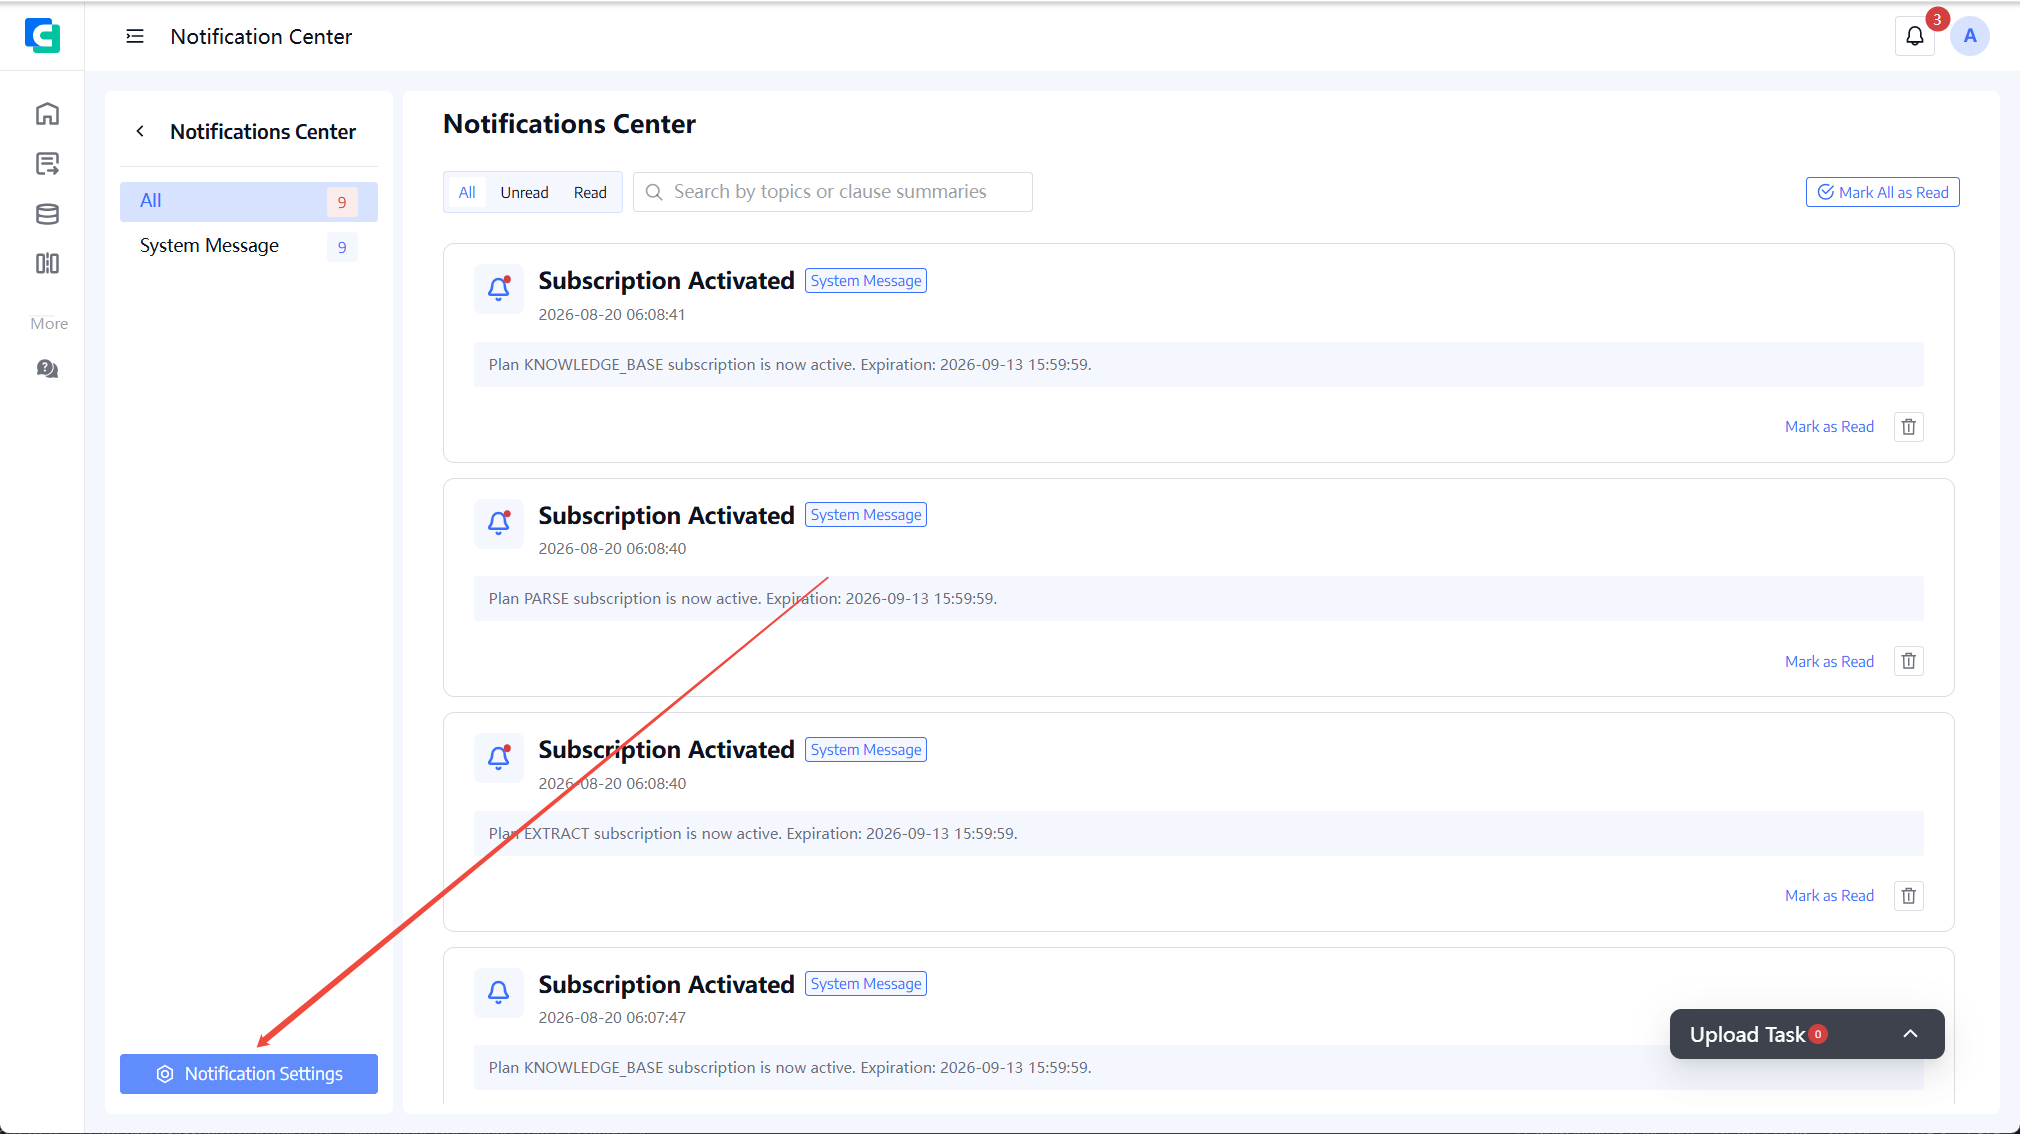
Open the message icon in the navigation bar or choose Message Center from the sidebar. The four top-level categories are All messages, System messages, System announcements, and User reminder rules. Rule messages are grouped by rule name.
Available actions include keyword search, mark all as read, open details, and delete one message.
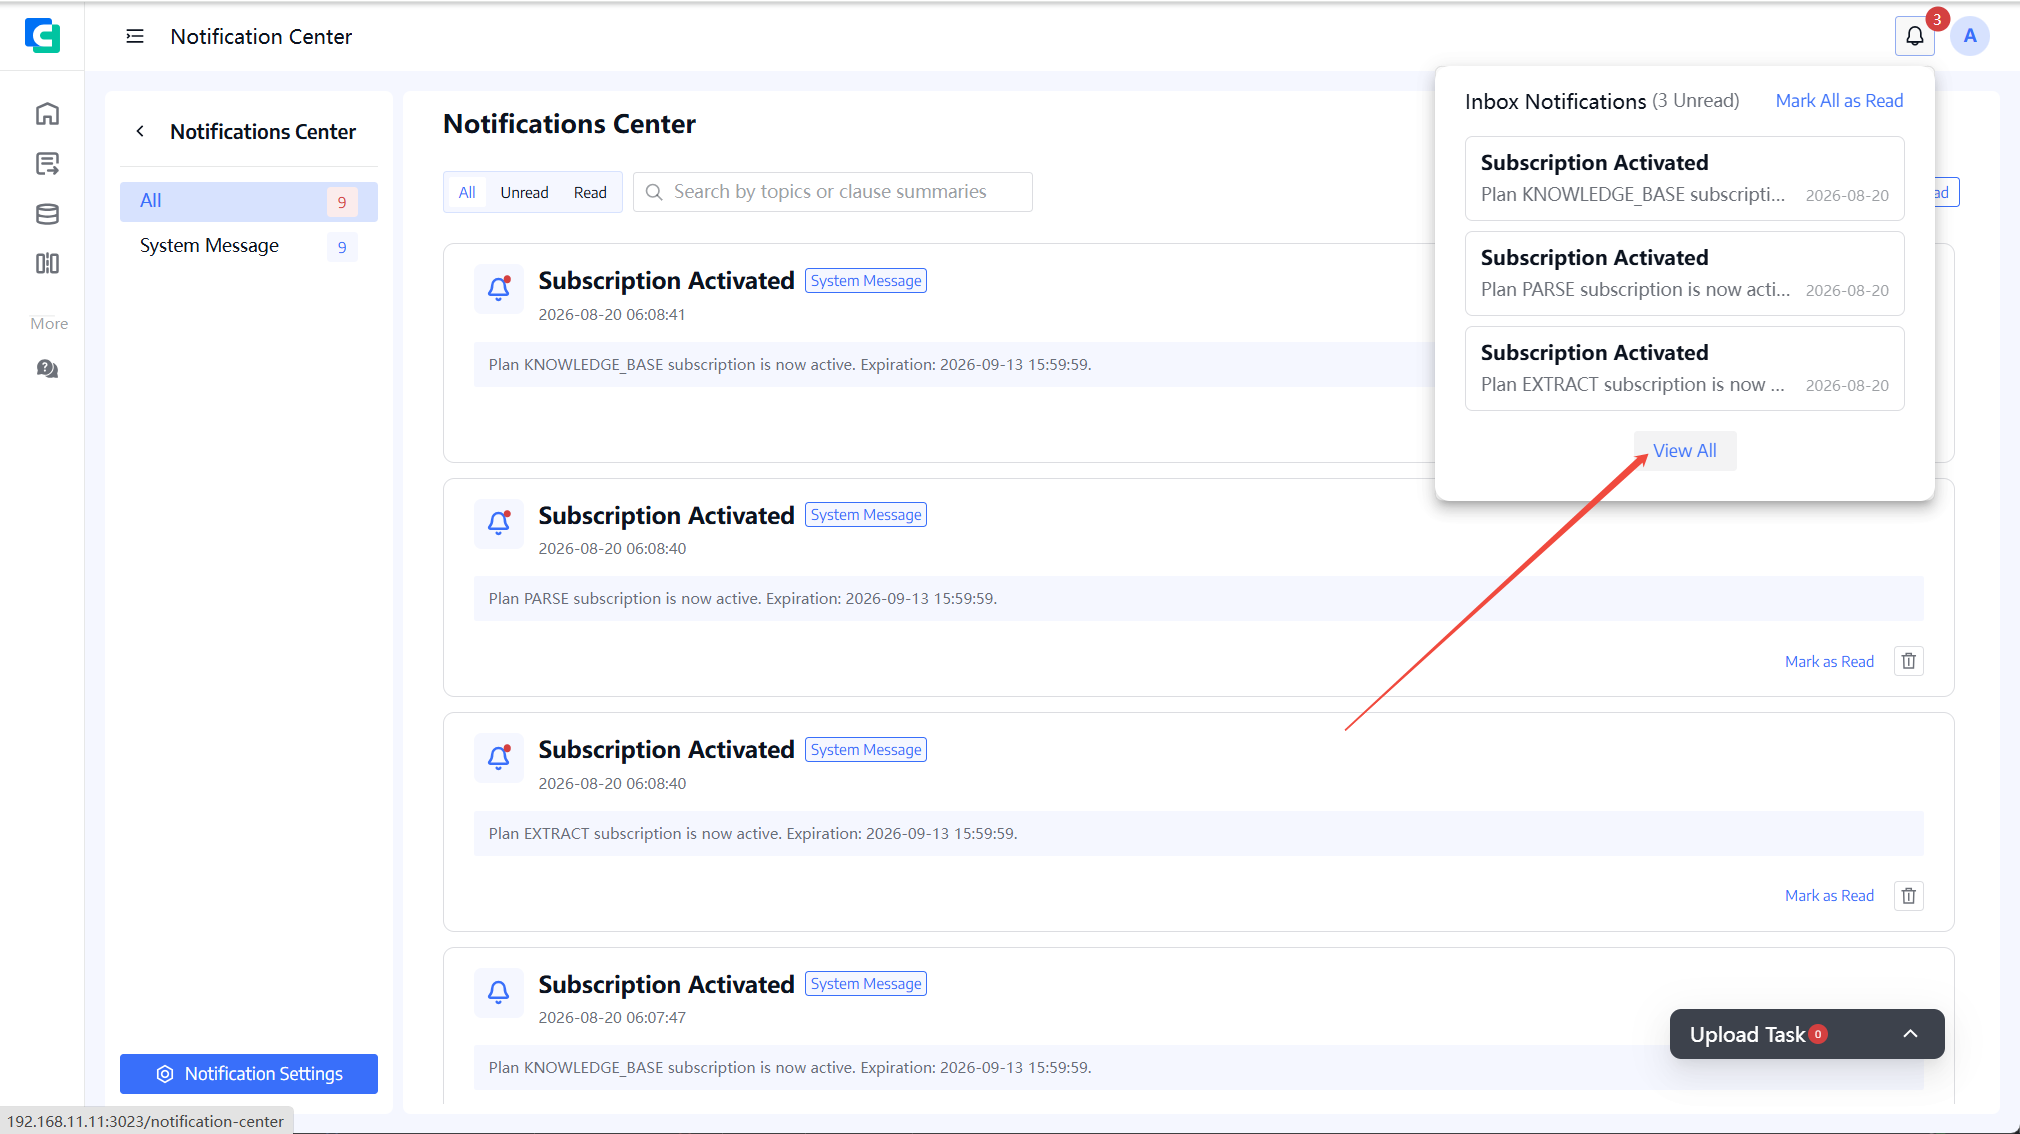
Click Settings in the Message Center to manage reminder rules. A rule contains a name, template data source, conditions, frequency, channels, recipients, title template, and content template.
Supported frequencies are daily, hourly, after extraction completes, and when a result is confirmed. Channels include in-app message, email, and Webhook. Organization members can receive in-app and email notifications; template field bindings are email-only and invalid email values are skipped.
The rule list supports enable, disable, edit, copy, and delete. A copied rule duplicates its configuration and starts disabled.
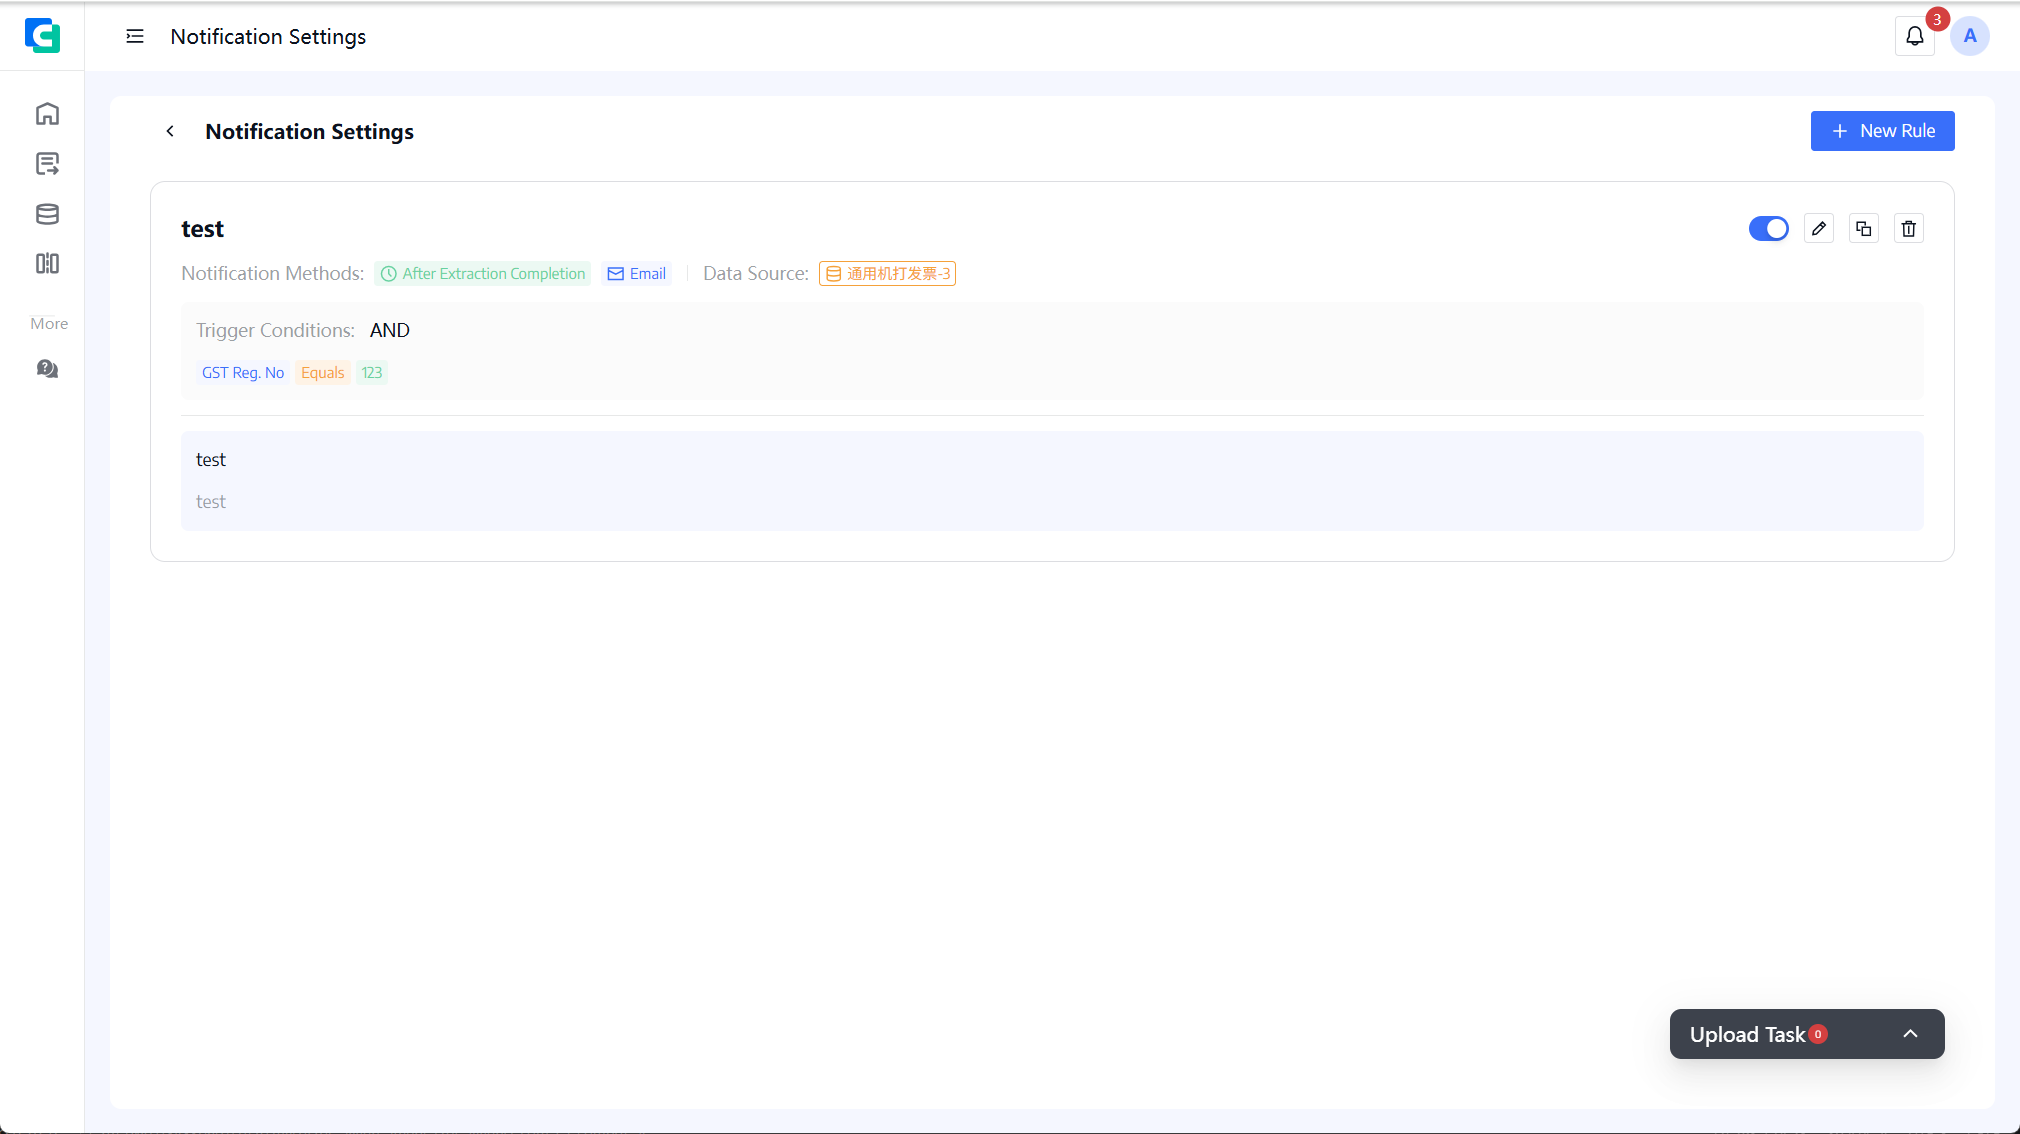
Each card shows the rule name, source template, condition summary, delivery channels, and actions to enable, disable, edit, copy, or delete the rule.
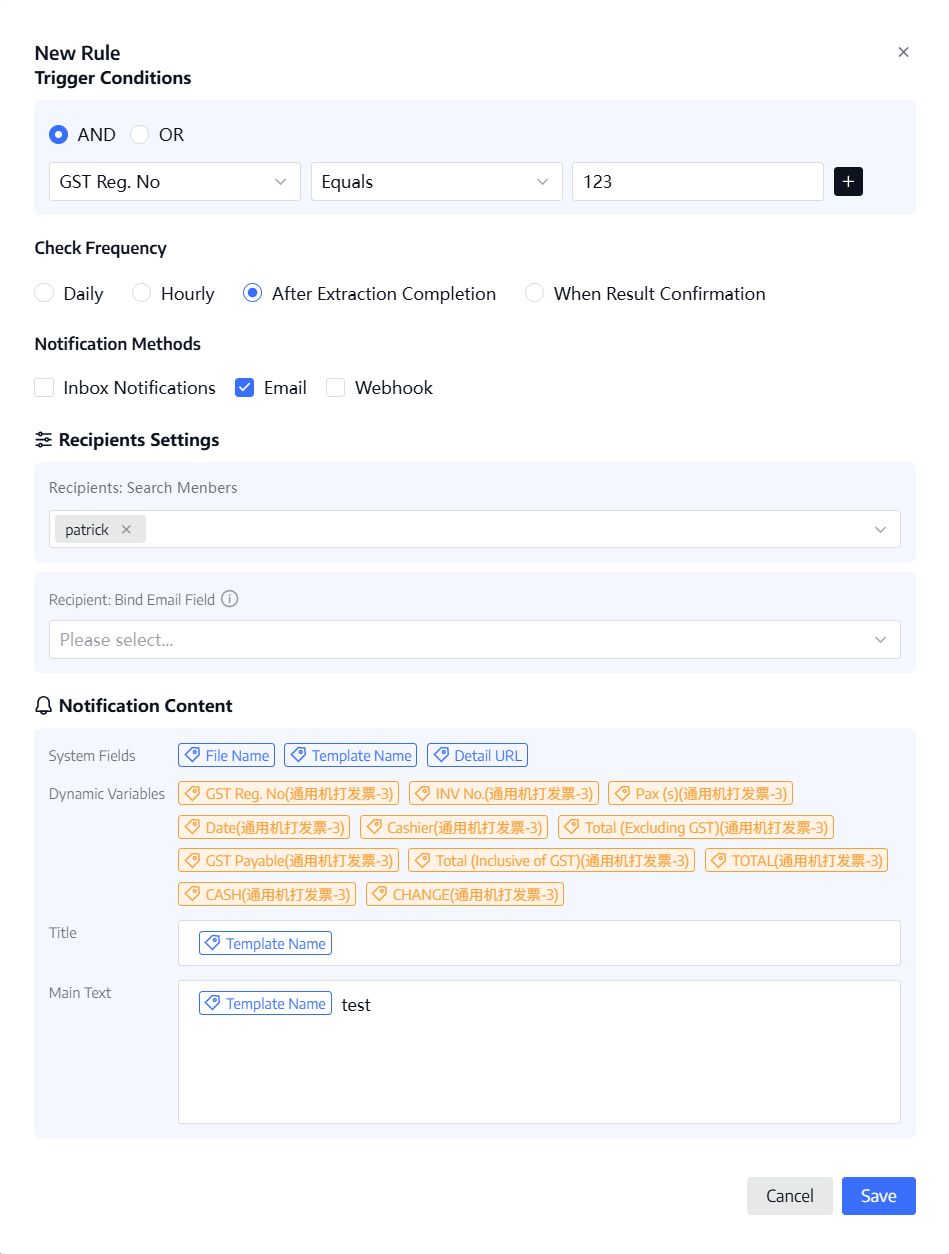
The condition selector provides the system fields Processing Status and Review Status, as well as text fields from the selected template. The notification template provides variables such as {file_name}, {template_name}, {detail_url}, and the selected template fields.
| Configuration item | Requirement |
|---|---|
| Rule name | Required; maximum 50 characters; unique in an organization. |
| Data source | Select a template associated with the current organization. |
| Conditions | At least one complete condition: field, operator, and comparison value. Add or remove rows while retaining at least one; combine rows with AND or OR. |
| Frequency | Daily, hourly, after extraction completes, or when a result is confirmed. |
| Delivery channels | Select at least one of in-app message, email, and Webhook. |
| Members/departments | Required where member/department recipients are used; members must belong to the organization. Department membership changes are applied automatically. |
| Template fields | Email only. Values are validated as email addresses at delivery time; invalid or empty values are skipped and logged. Multiple comma-separated addresses are split. |
| Webhooks | Required when the Webhook channel is selected. Select active Webhooks subscribed to the rule-triggered event. |
| Title | Required; maximum 100 characters; supports variables. |
| Content | Required; maximum 500 characters; supports variables. |
The same address from member, department, direct, or field sources is delivered once. A Webhook that is later disabled or deleted is skipped during rule execution; other channels continue normally. Failed mail and Webhook delivery does not interrupt the rule evaluation flow.
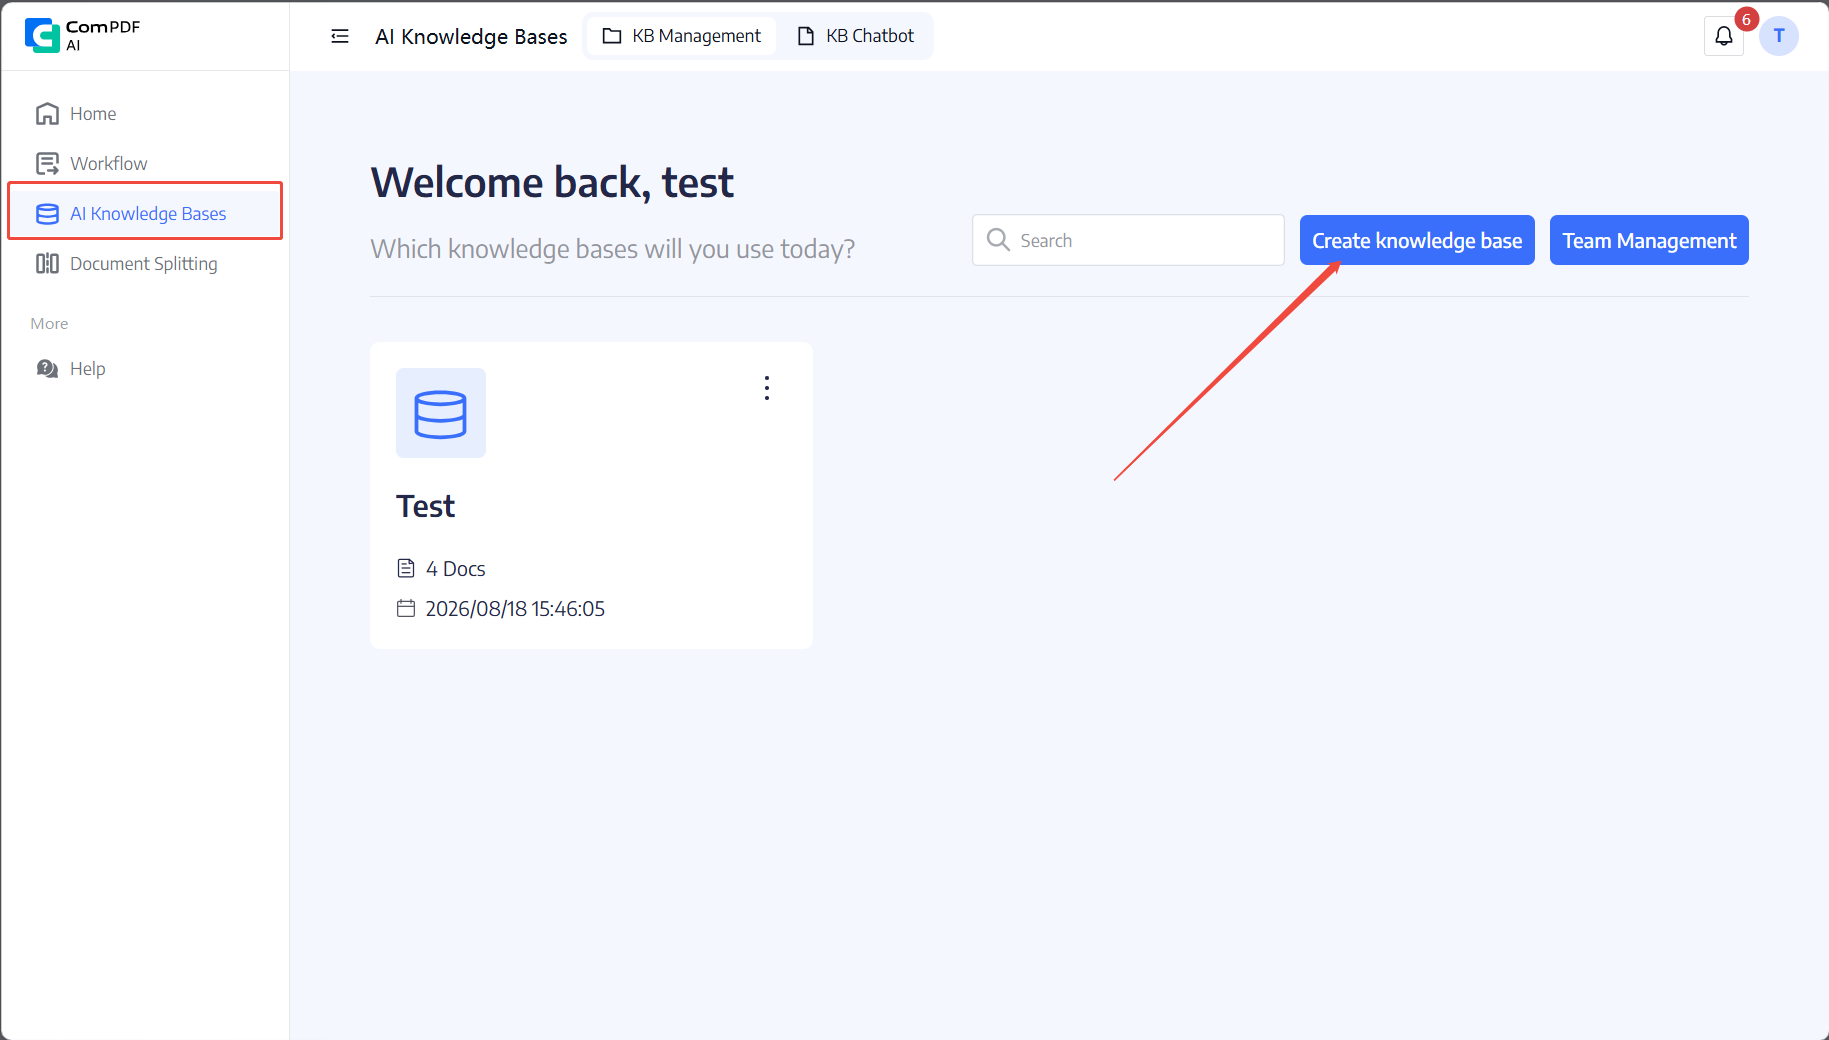
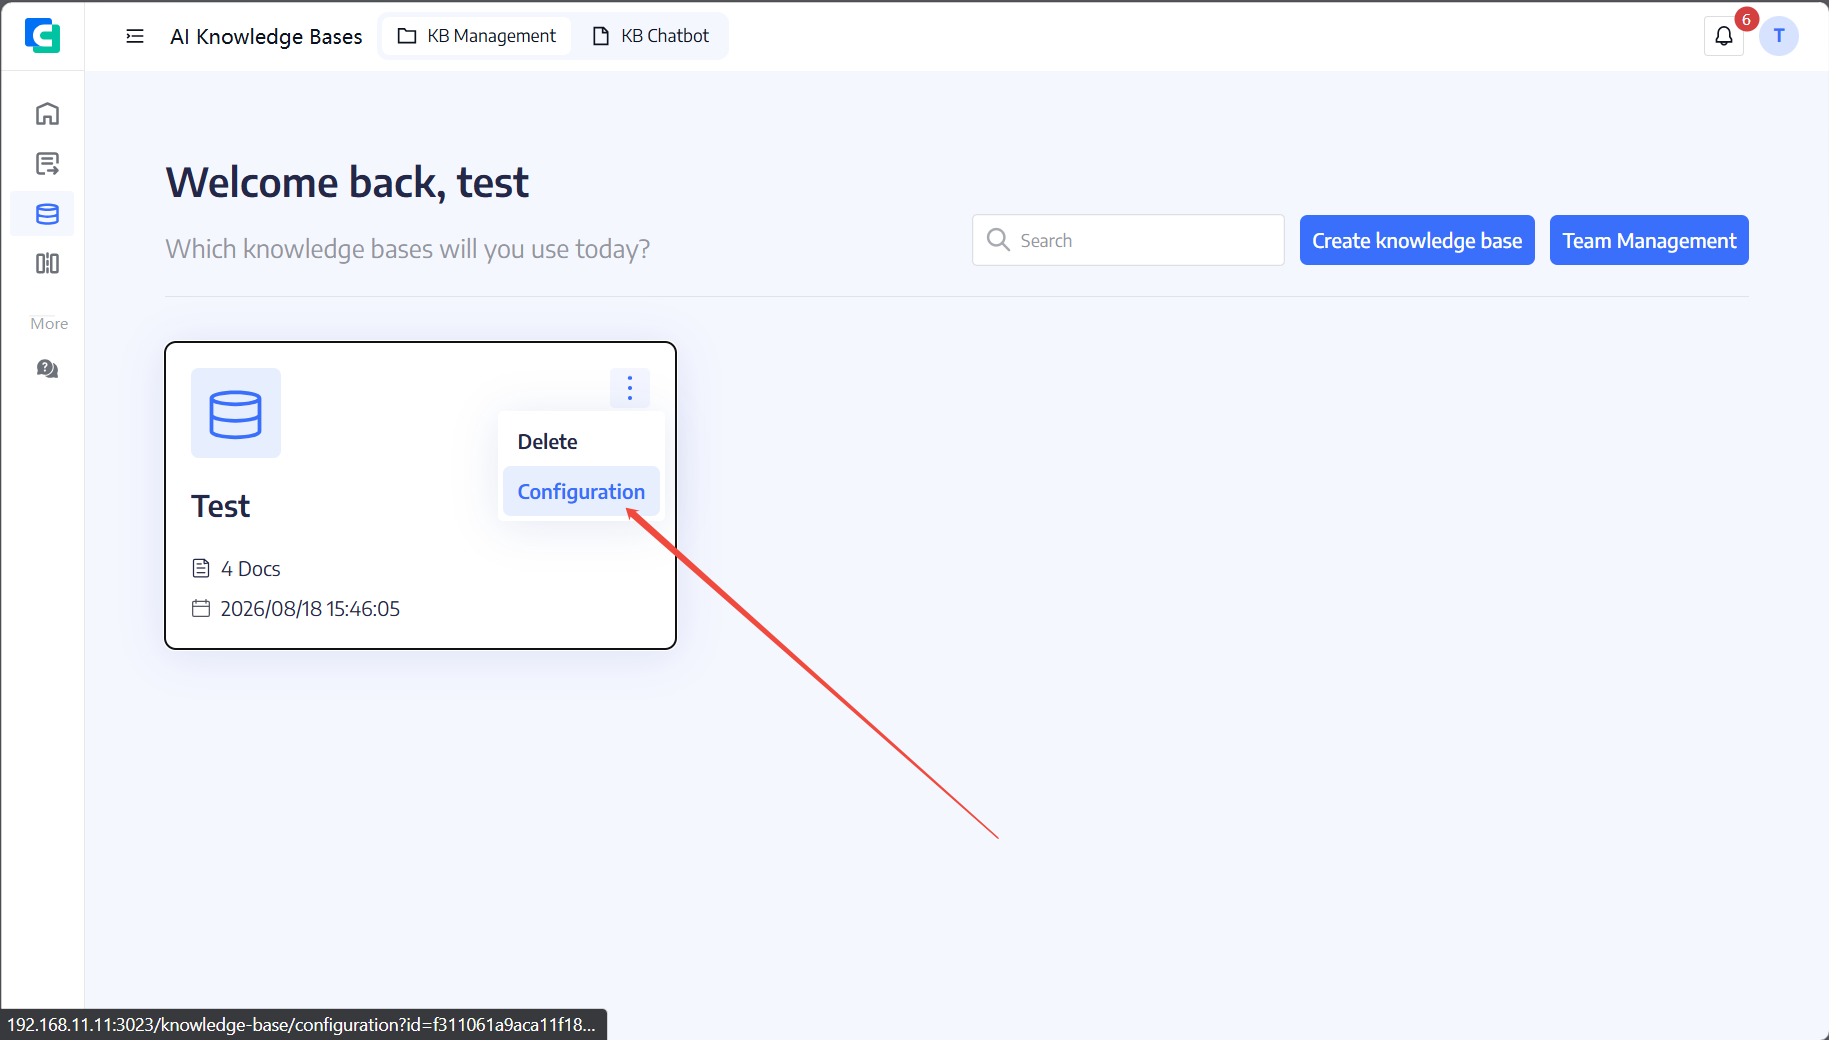
Open Intelligent Knowledge Base, click Create knowledge base, and enter a name. Open a knowledge base to configure it or delete it from the management list.
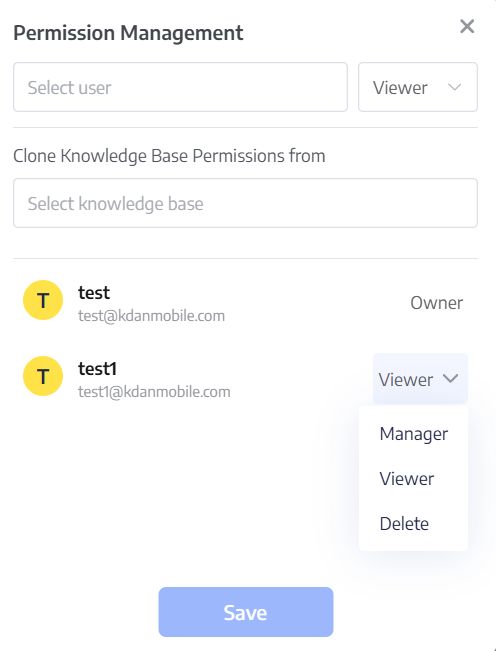
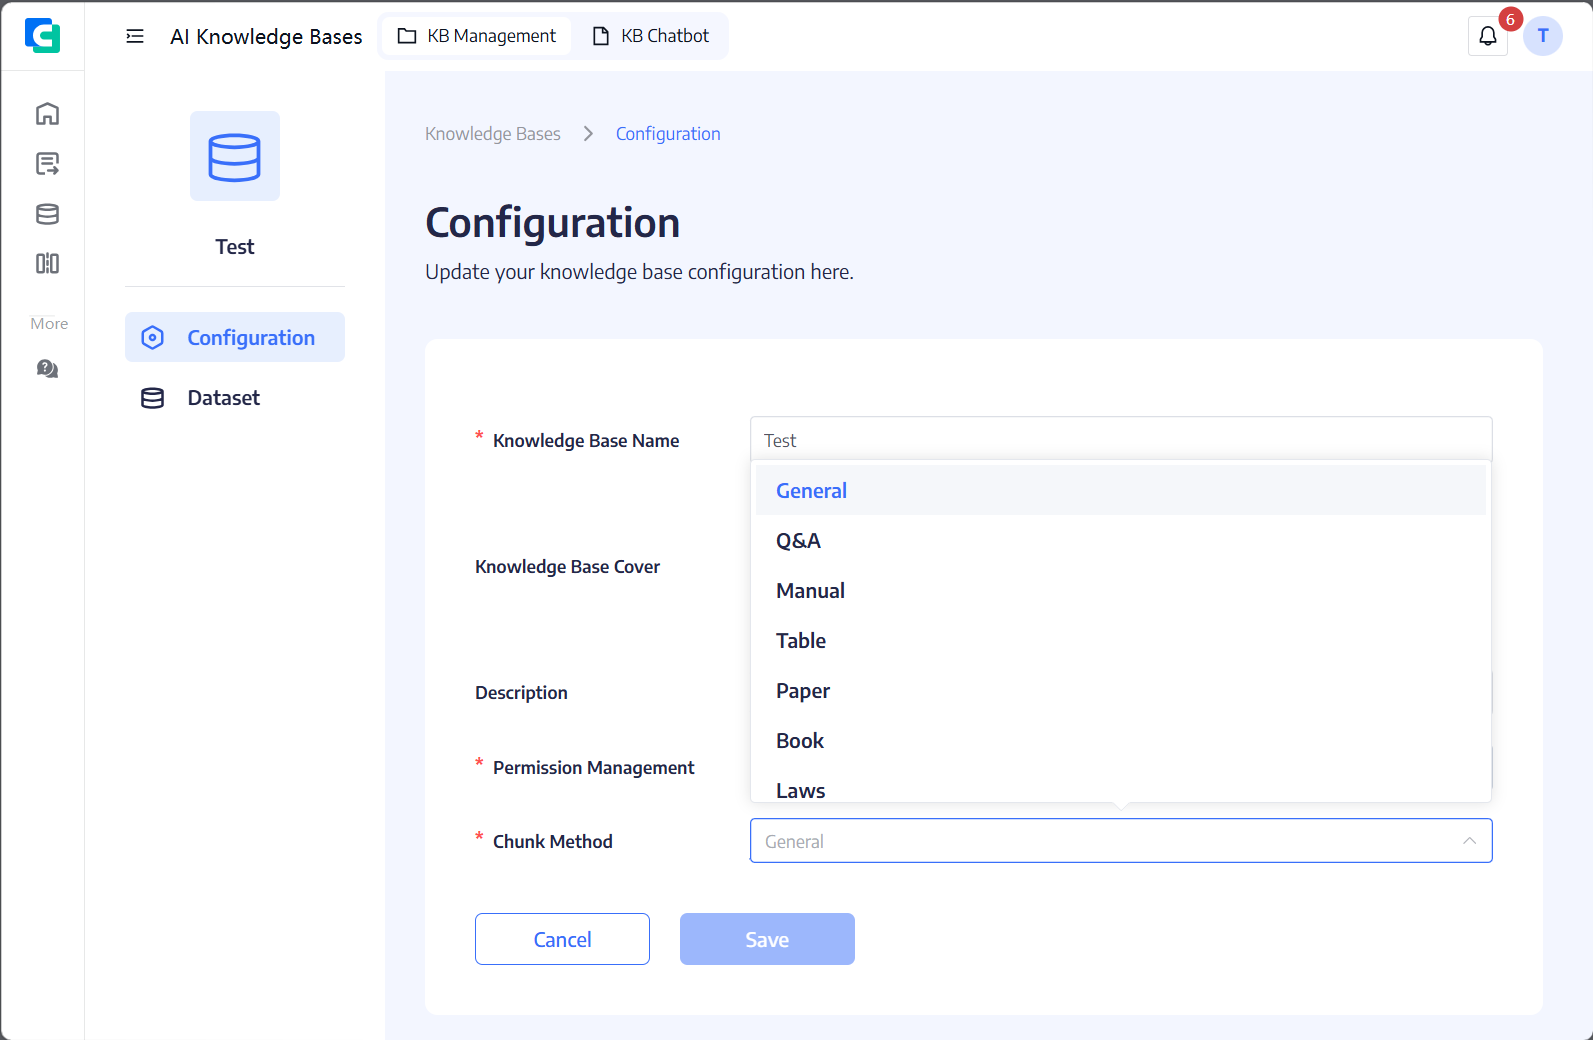
Configure the name, cover, description, permissions, and chunking method.
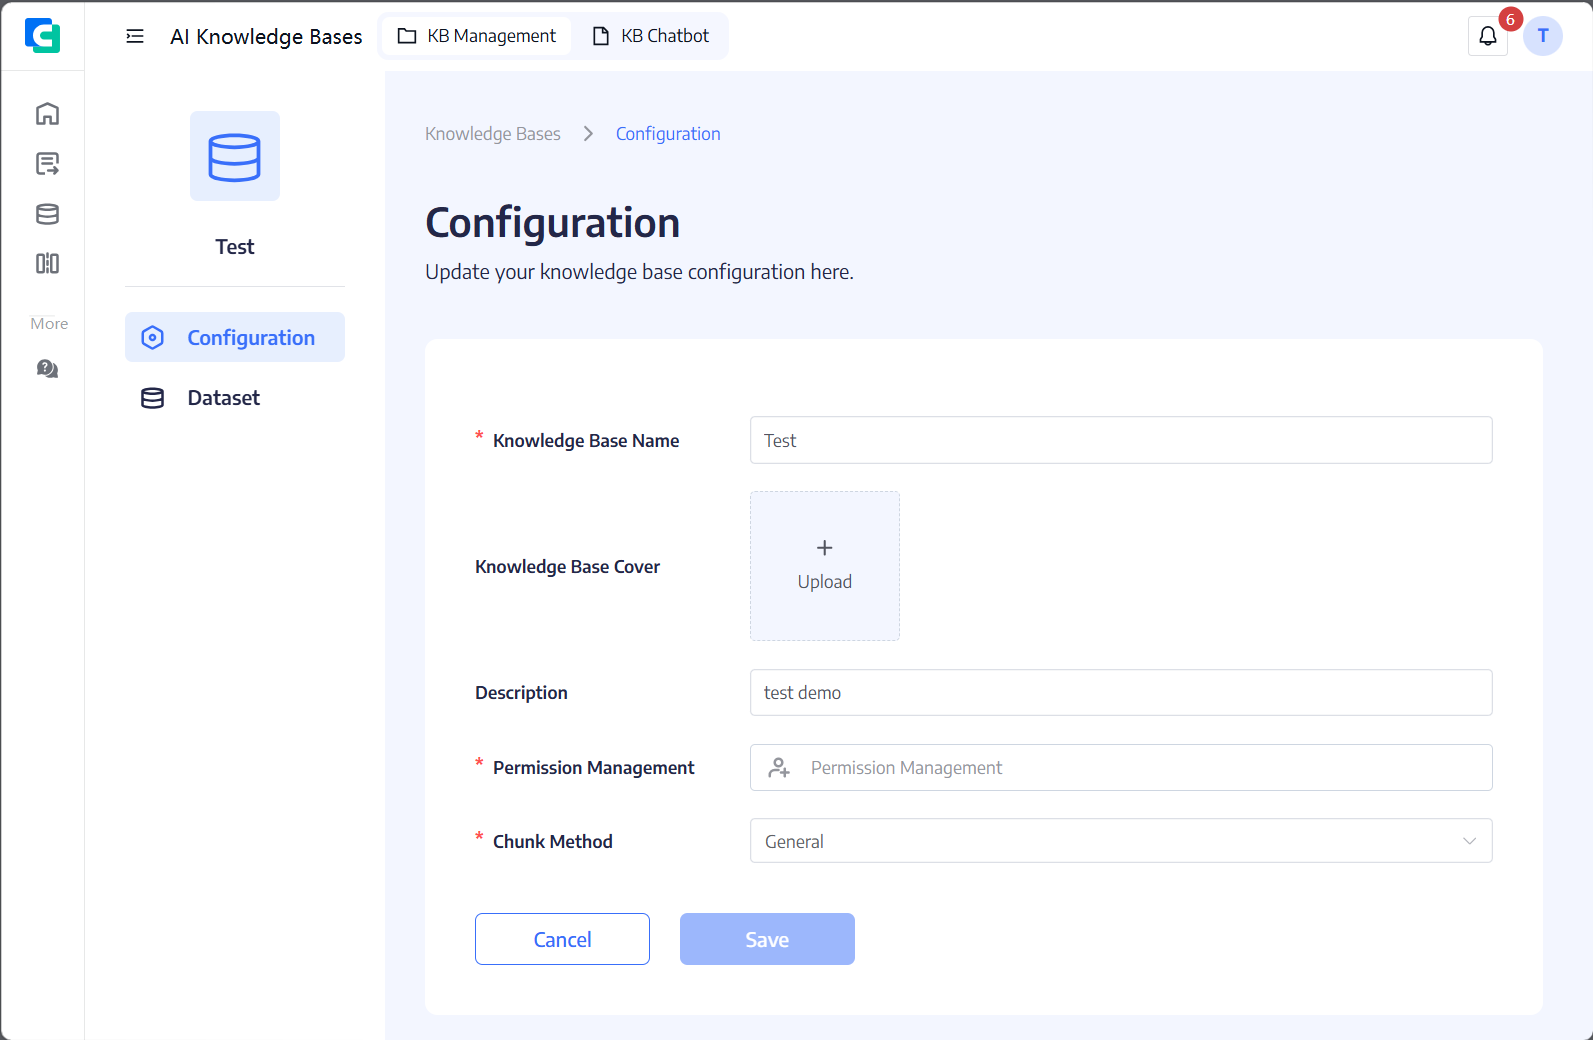
Add registered team members and assign View or Manage permission. Viewers can ask questions; managers can configure the knowledge base and manage its dataset.
Choose a chunking method that matches the source material. Available methods include General, Q&A, Resume, Manual, Table, Paper, Book, Legal, Presentation, and Whole document.
Open the Dataset tab and click Upload files. You can start parsing automatically or upload first and parse manually. Supported formats include Office files, PDF, TXT, images, CSV, and JSON. You can also upload a web URL and choose a crawl depth.
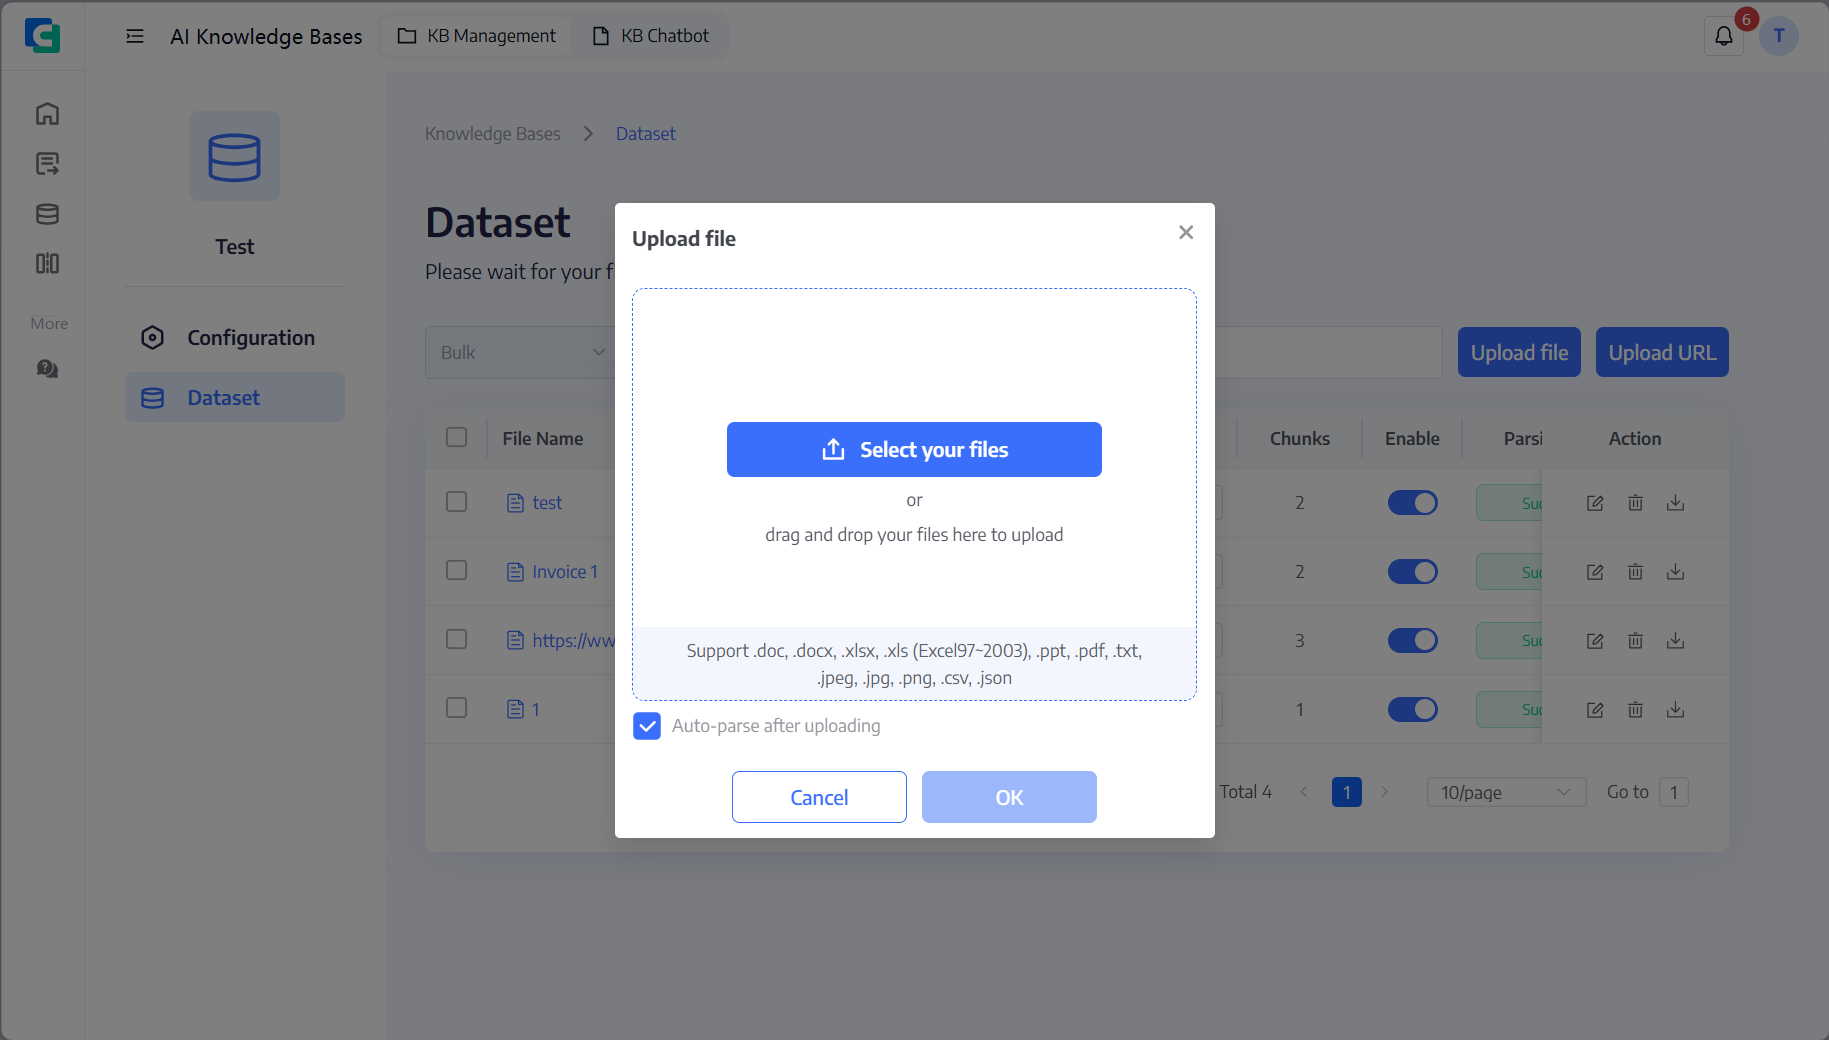
The dataset list shows file name, format, update time, chunking method, chunk count, enabled state, and parsing state. Files can be renamed, downloaded, deleted, re-parsed, enabled, or disabled. Select multiple files for batch operations, or open a file to edit individual chunks.
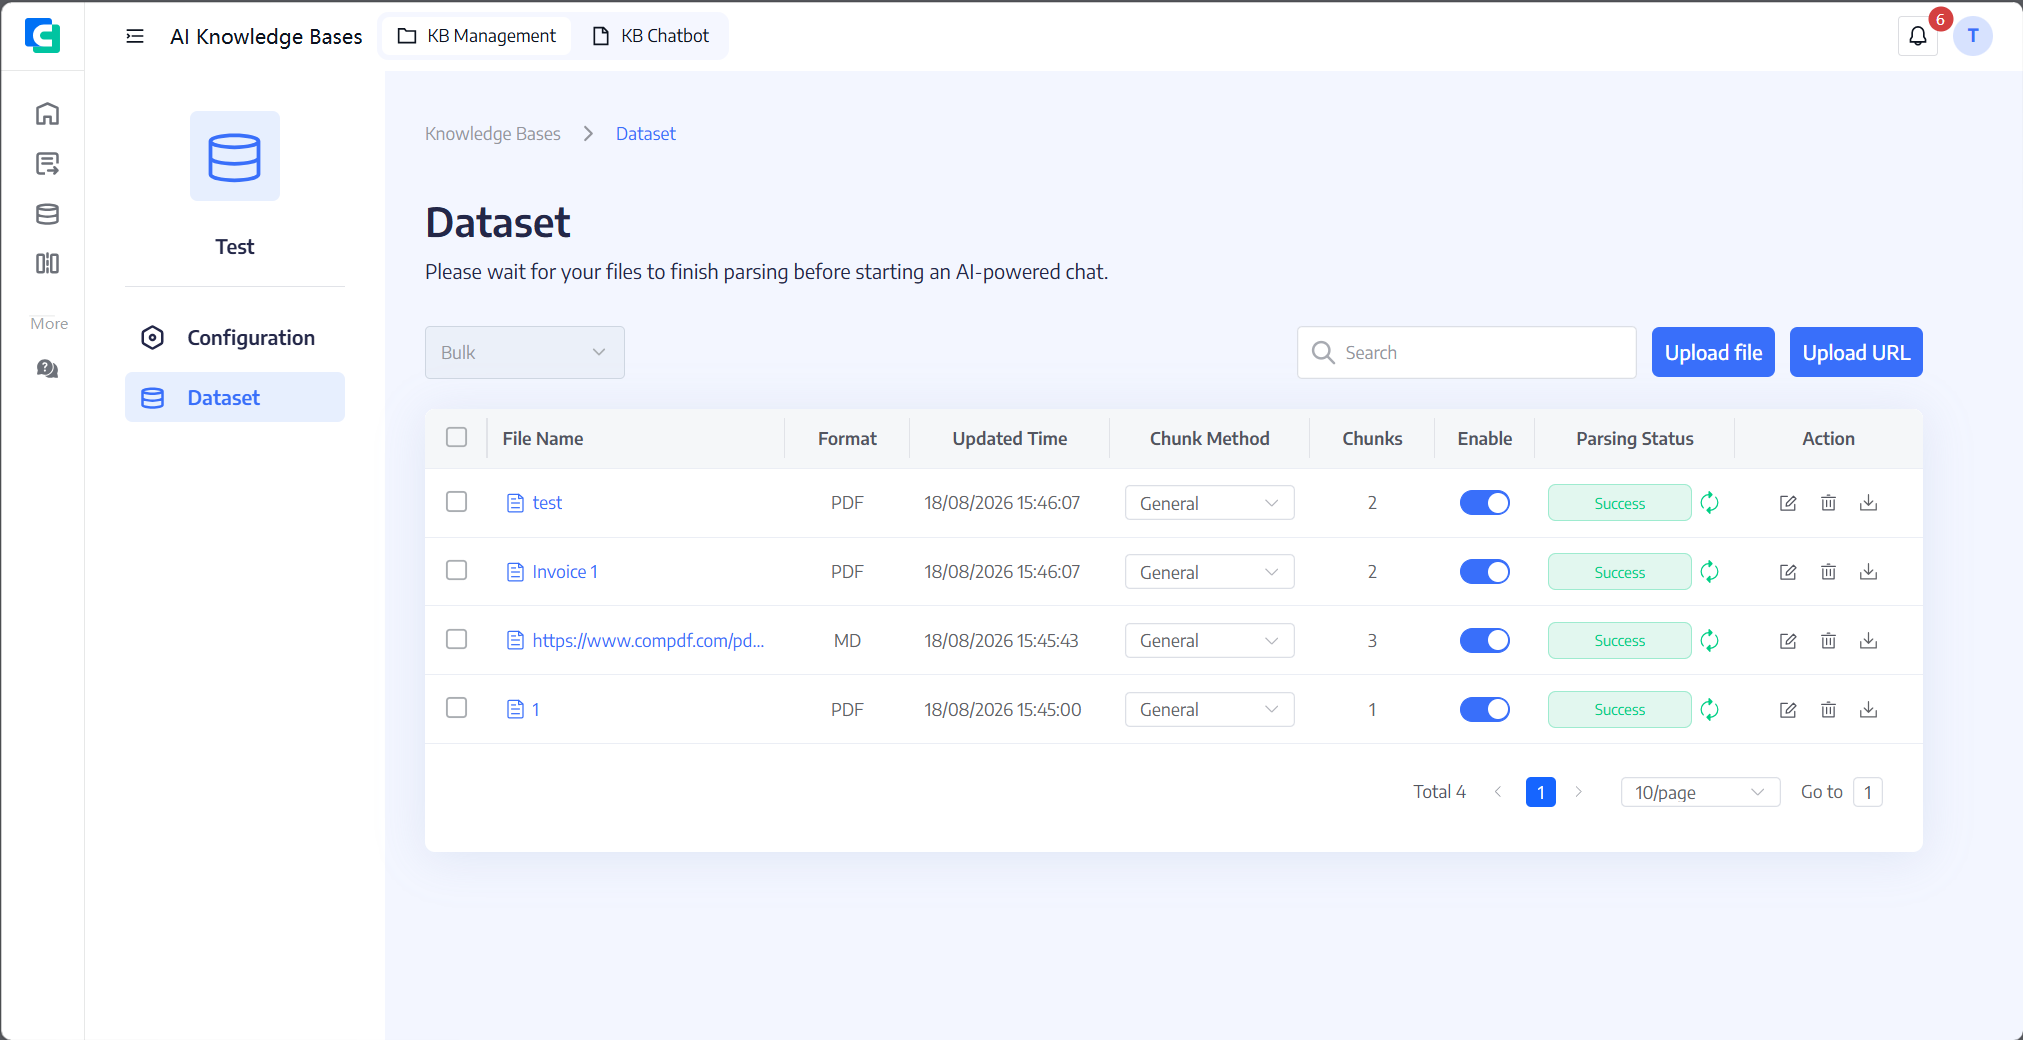
You can perform batch operations on uploaded files: after selecting multiple files, click the Batch button shown below to batch enable, disable, parse, cancel parsing, or delete them.
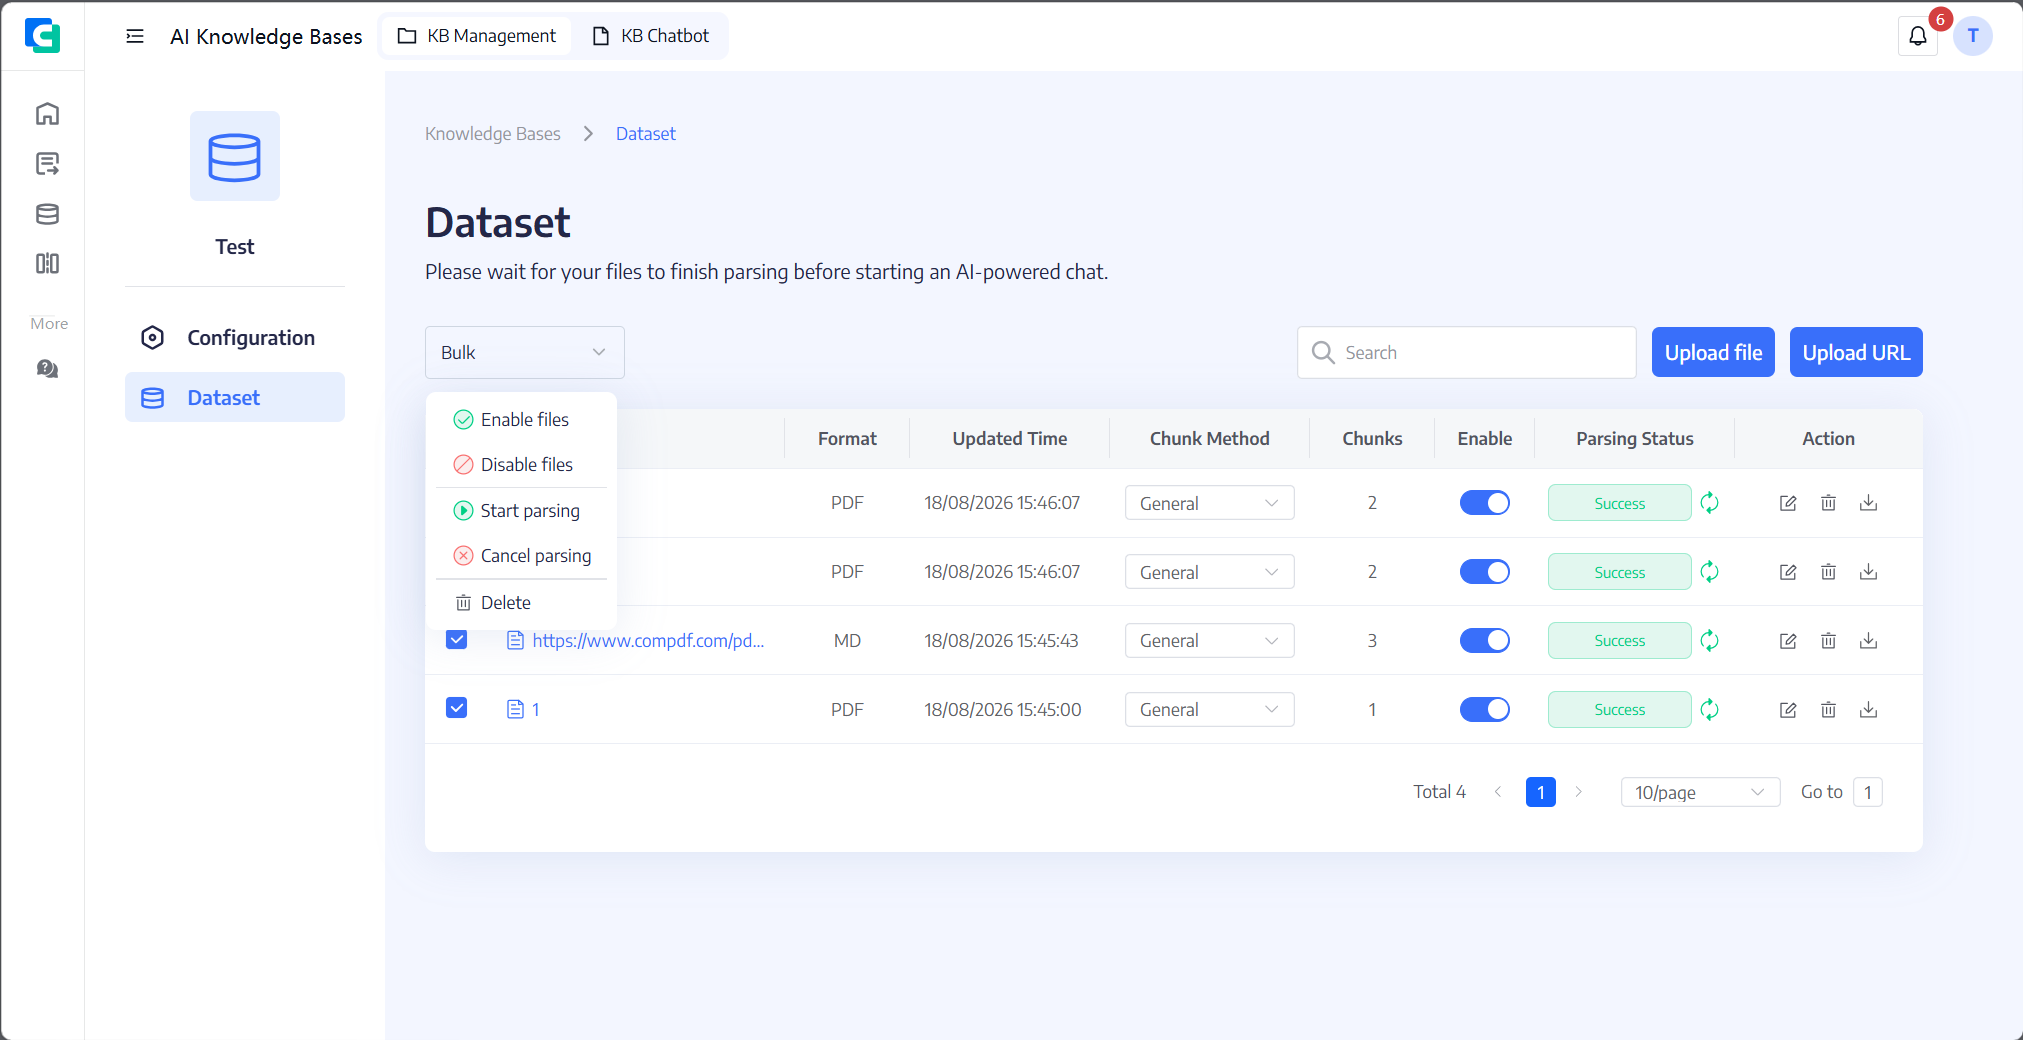
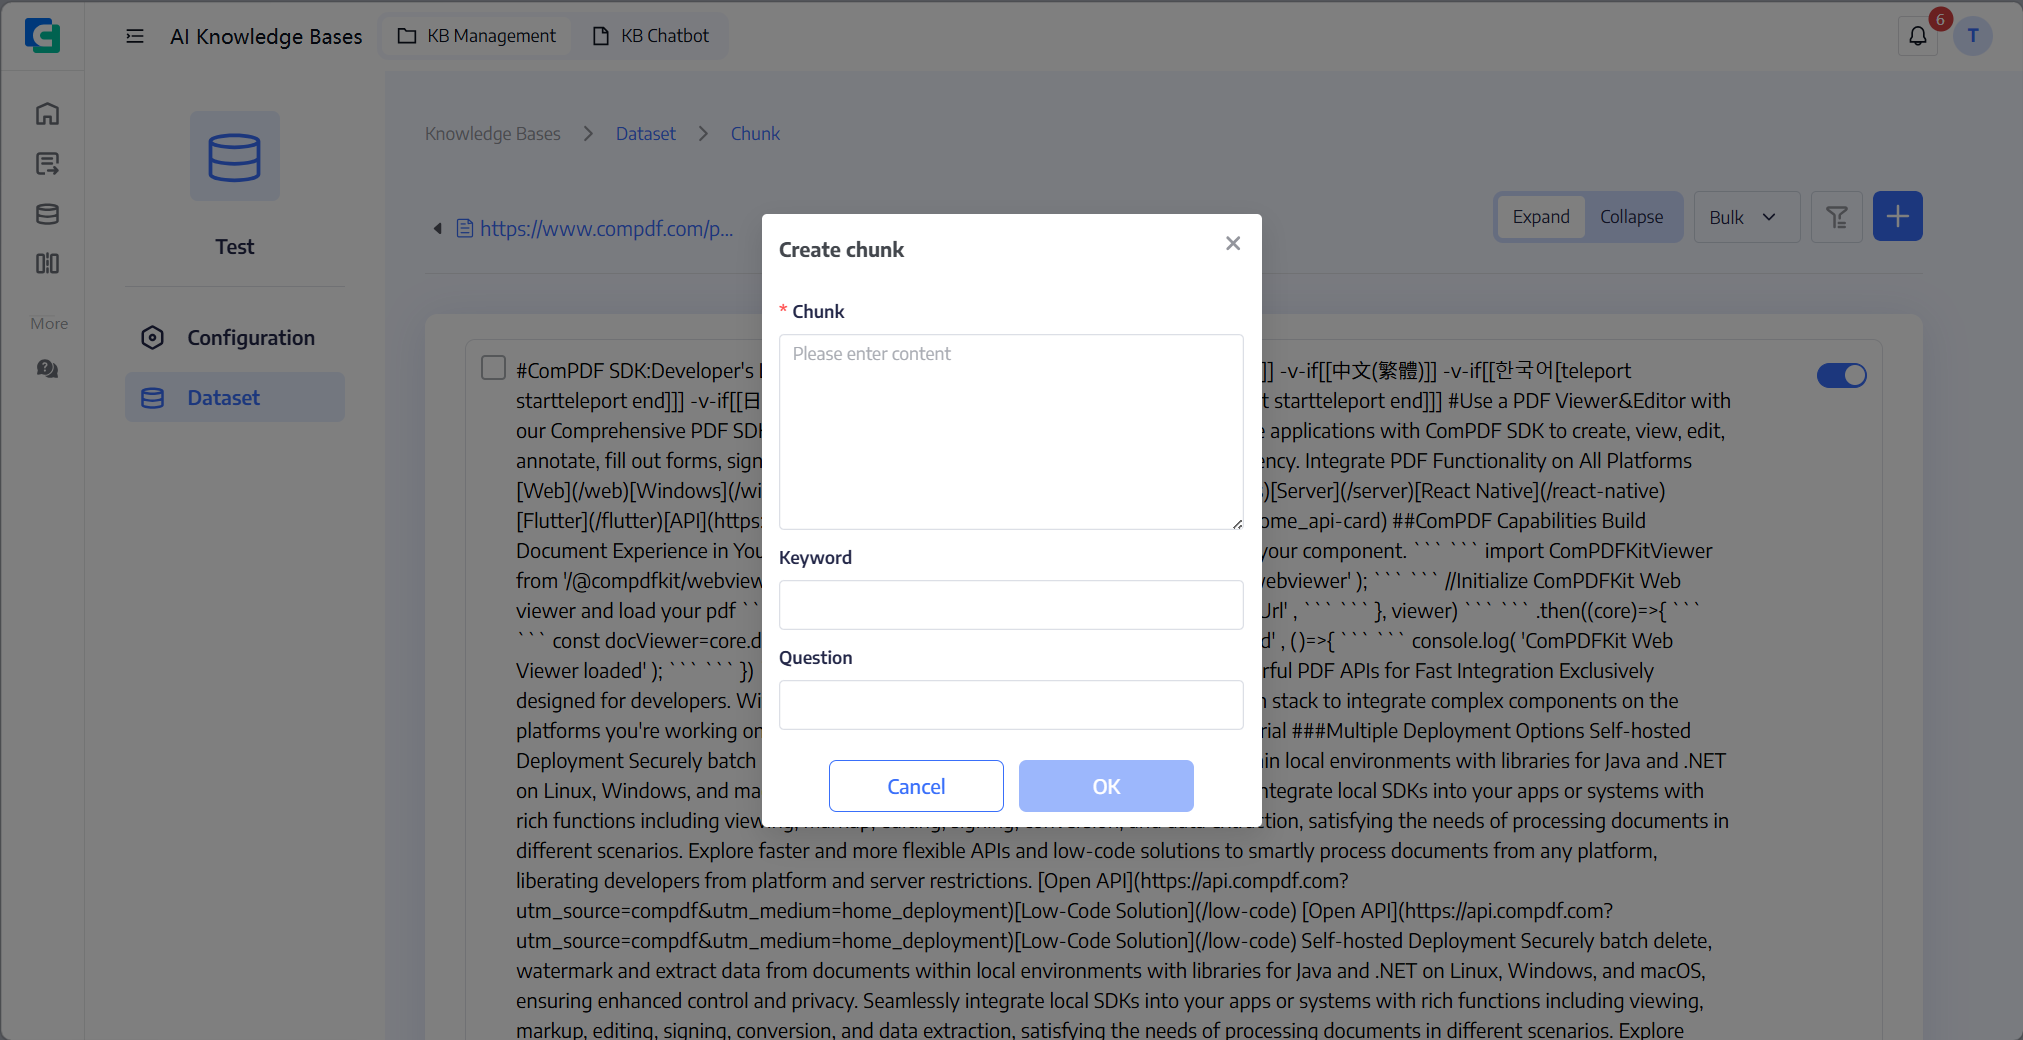
Click a file name to view the parsed segments of that file; you can enable, disable, or delete the current parsed segments. Click the button shown below and enter the parsed segment, keywords, and question to create a new parsed segment.
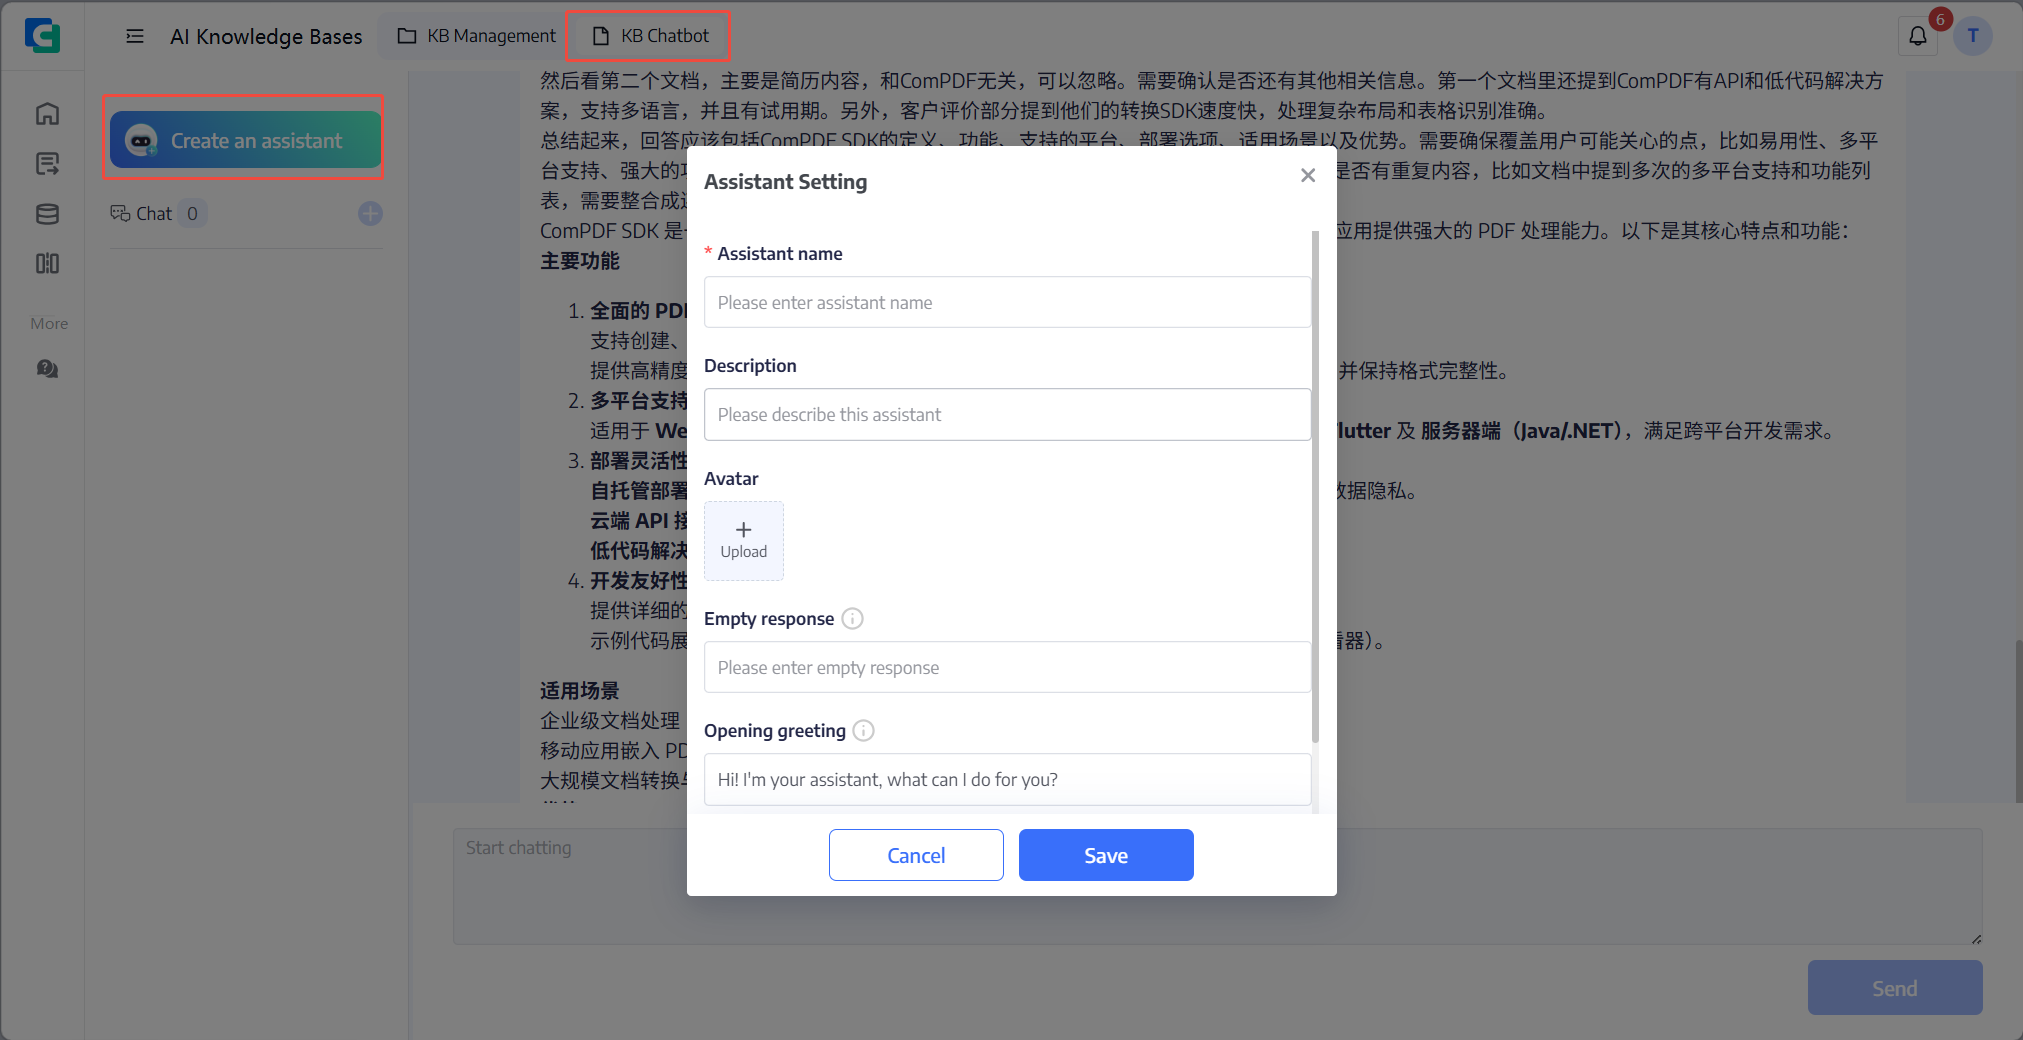
Create an assistant with a name, description, avatar, empty-answer text, and welcome message. Associate one or more knowledge bases and choose whether citations are displayed.
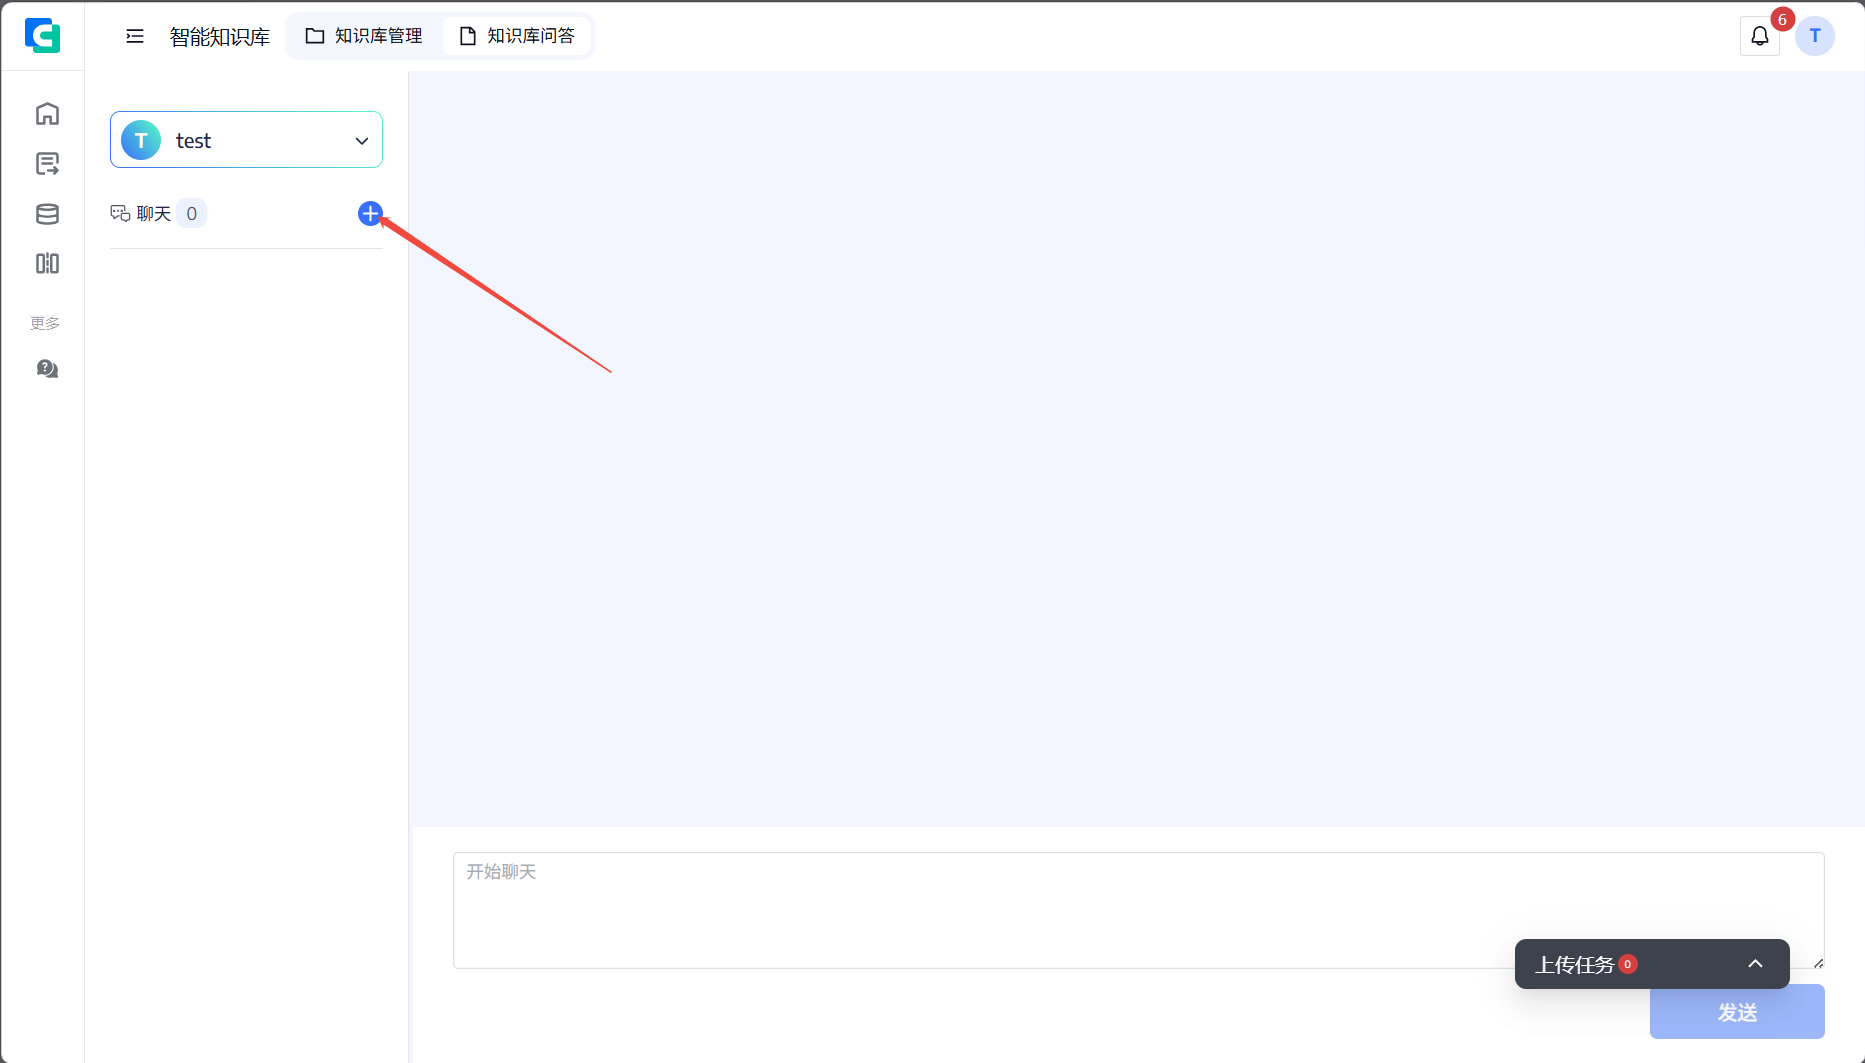
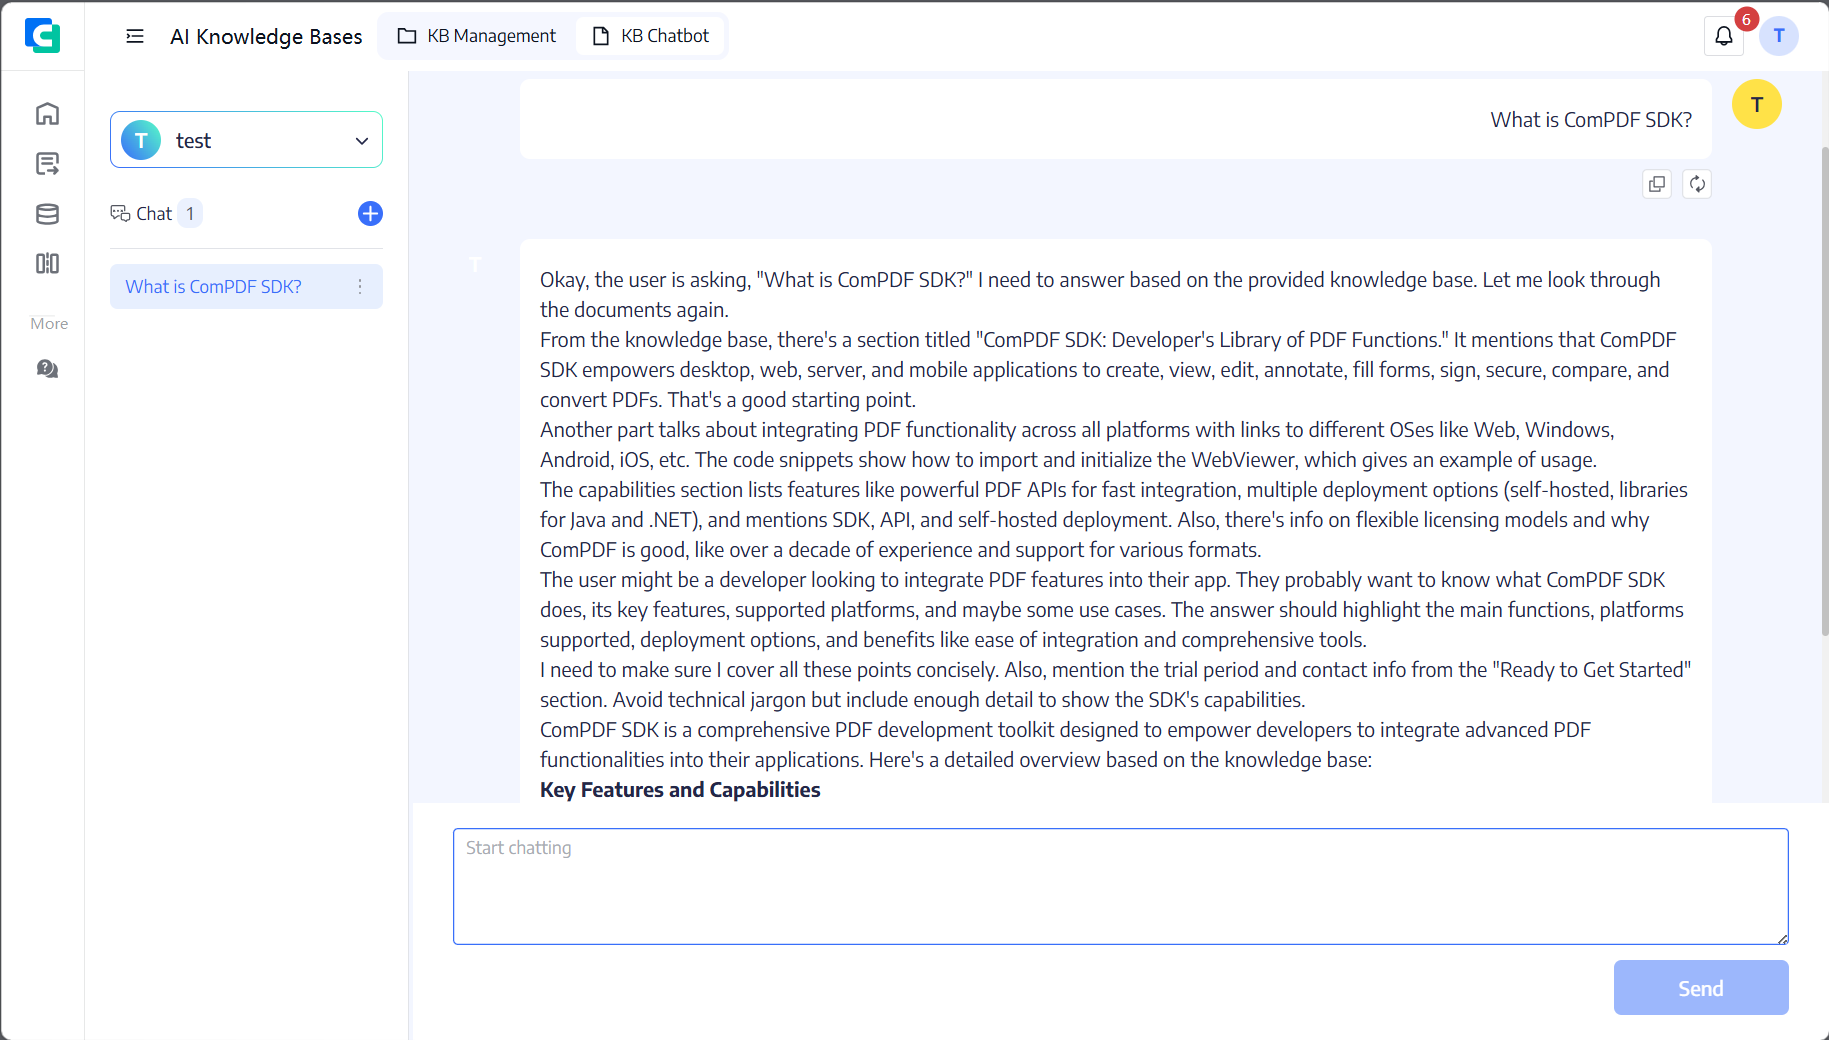
After creating an assistant, enter a question in the Q&A page. The assistant answers using the associated knowledge bases and can show source citations.
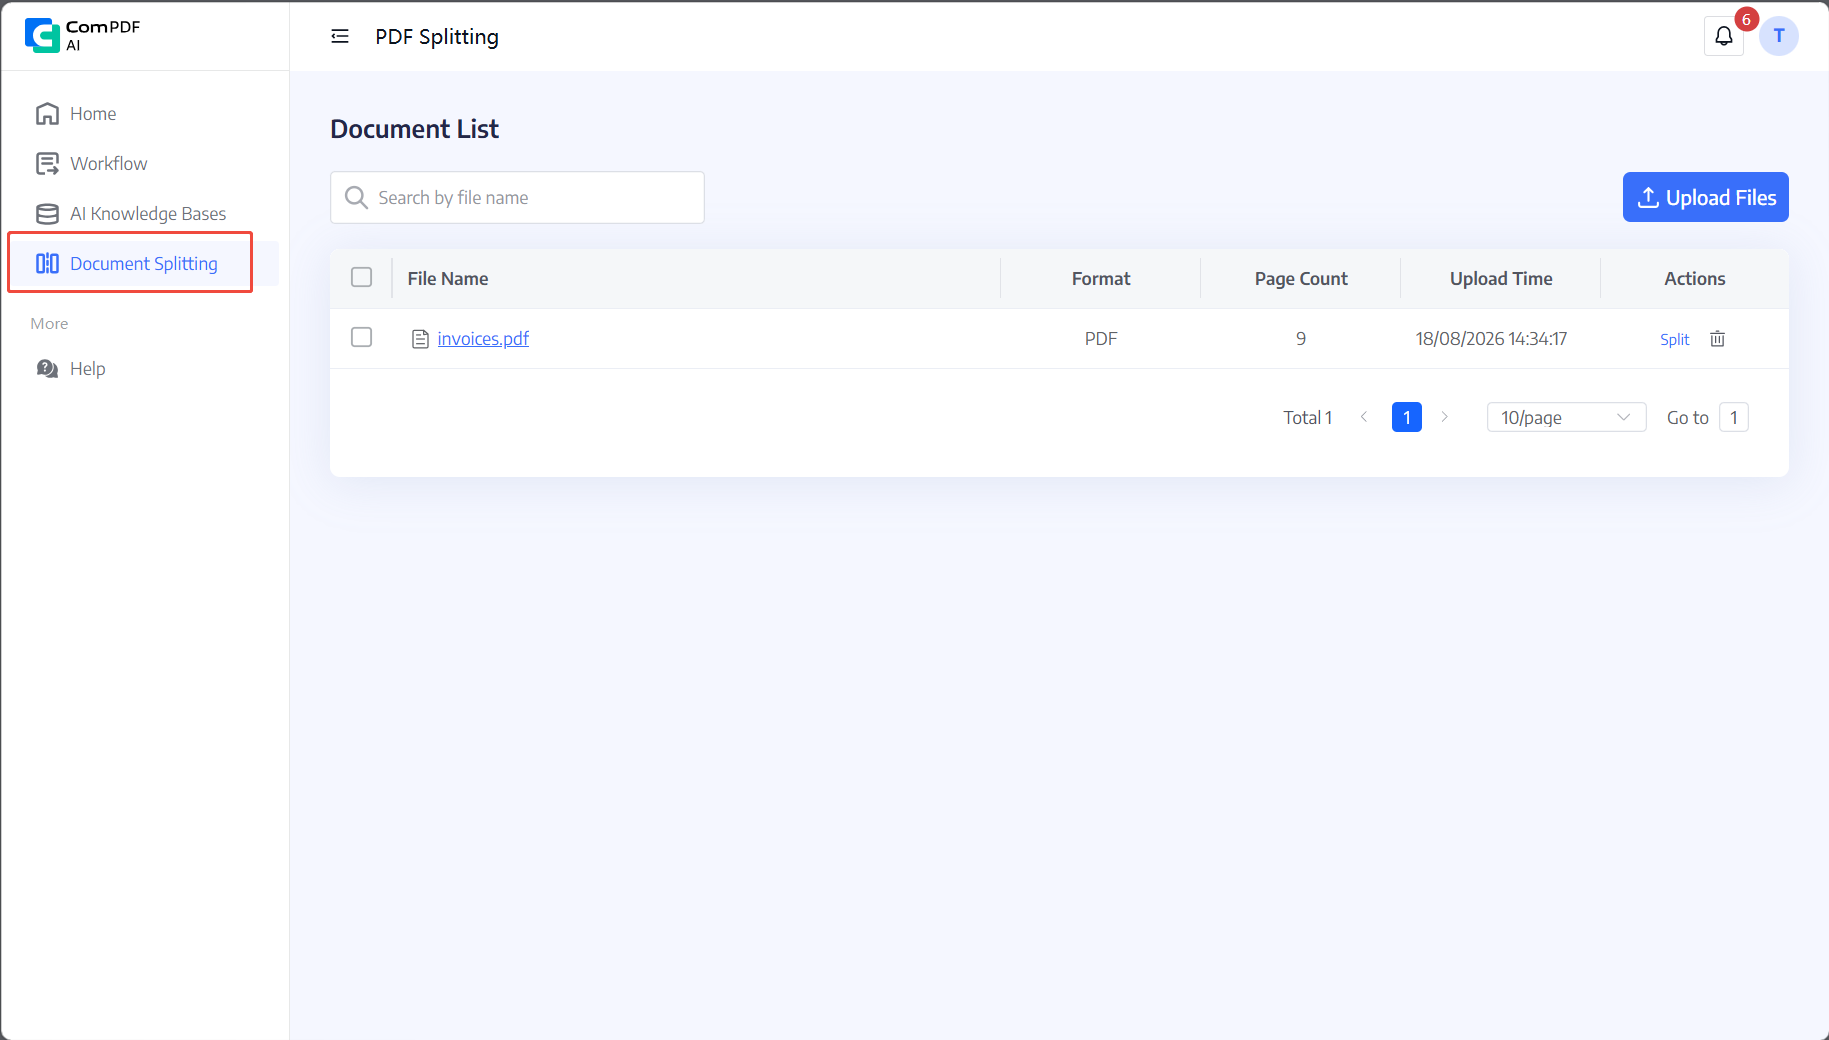
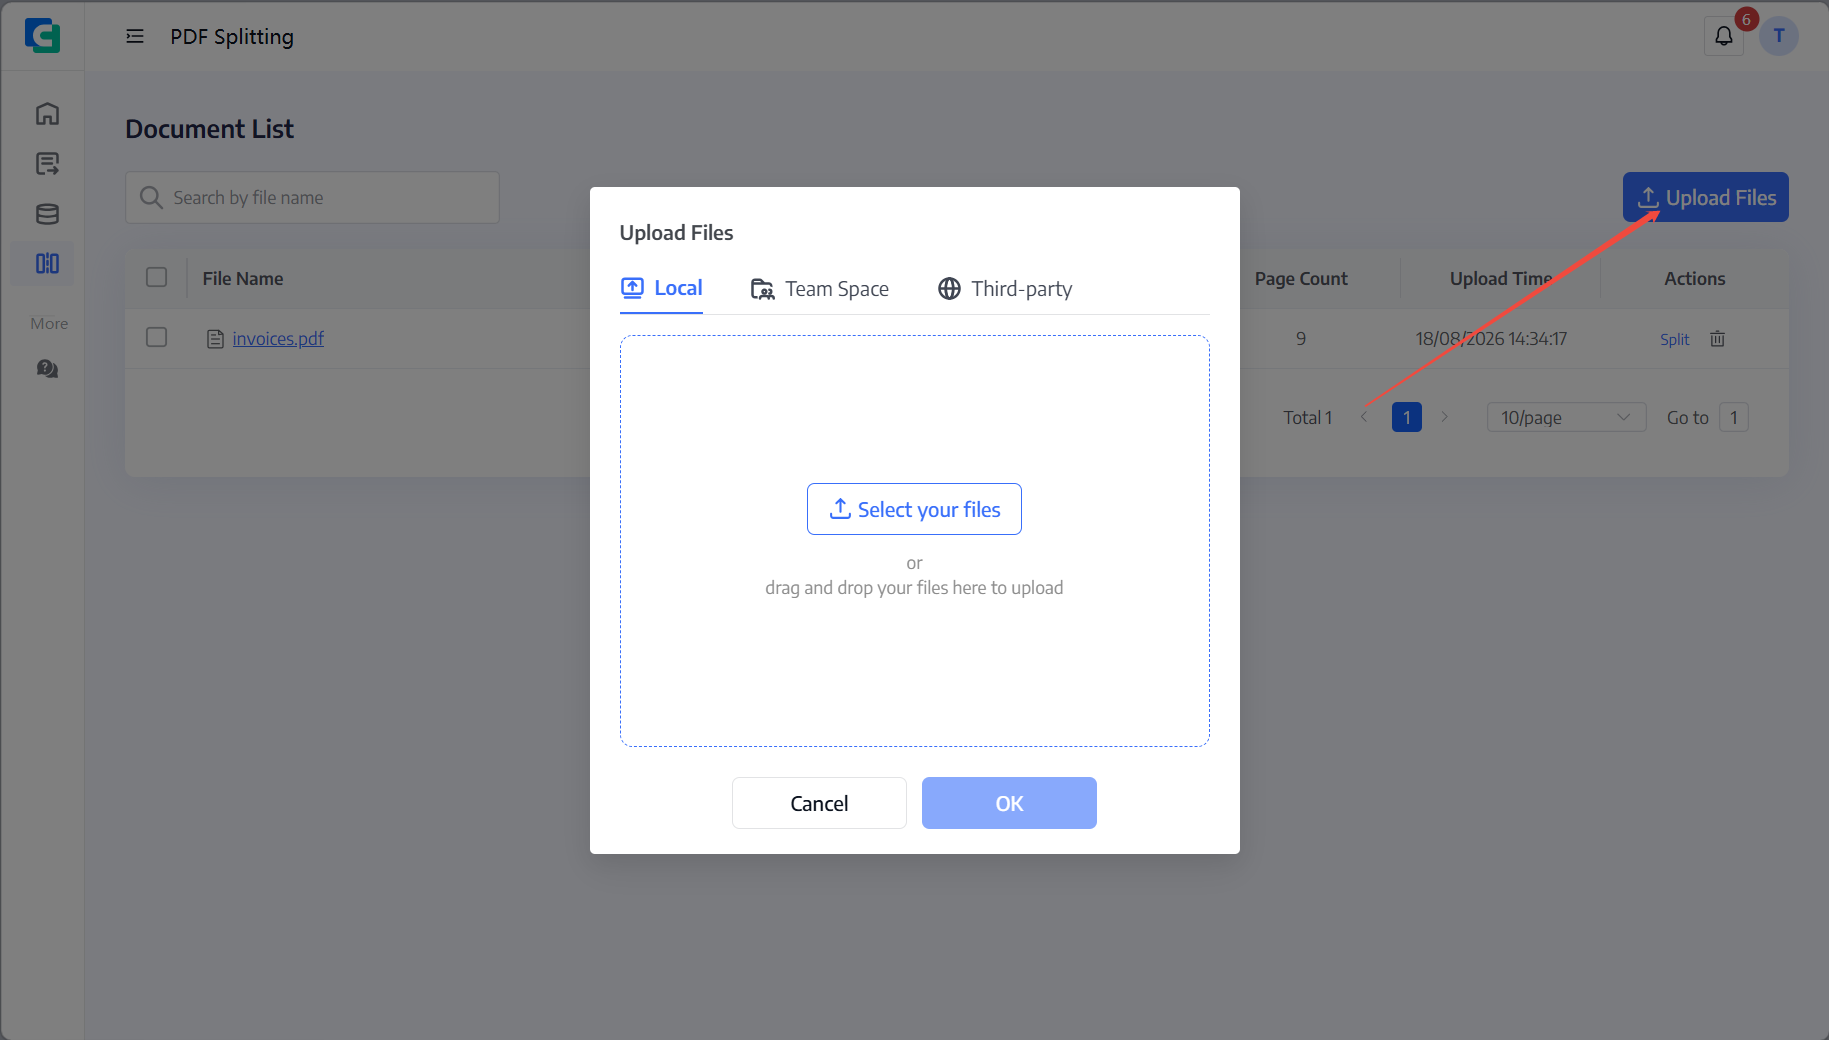
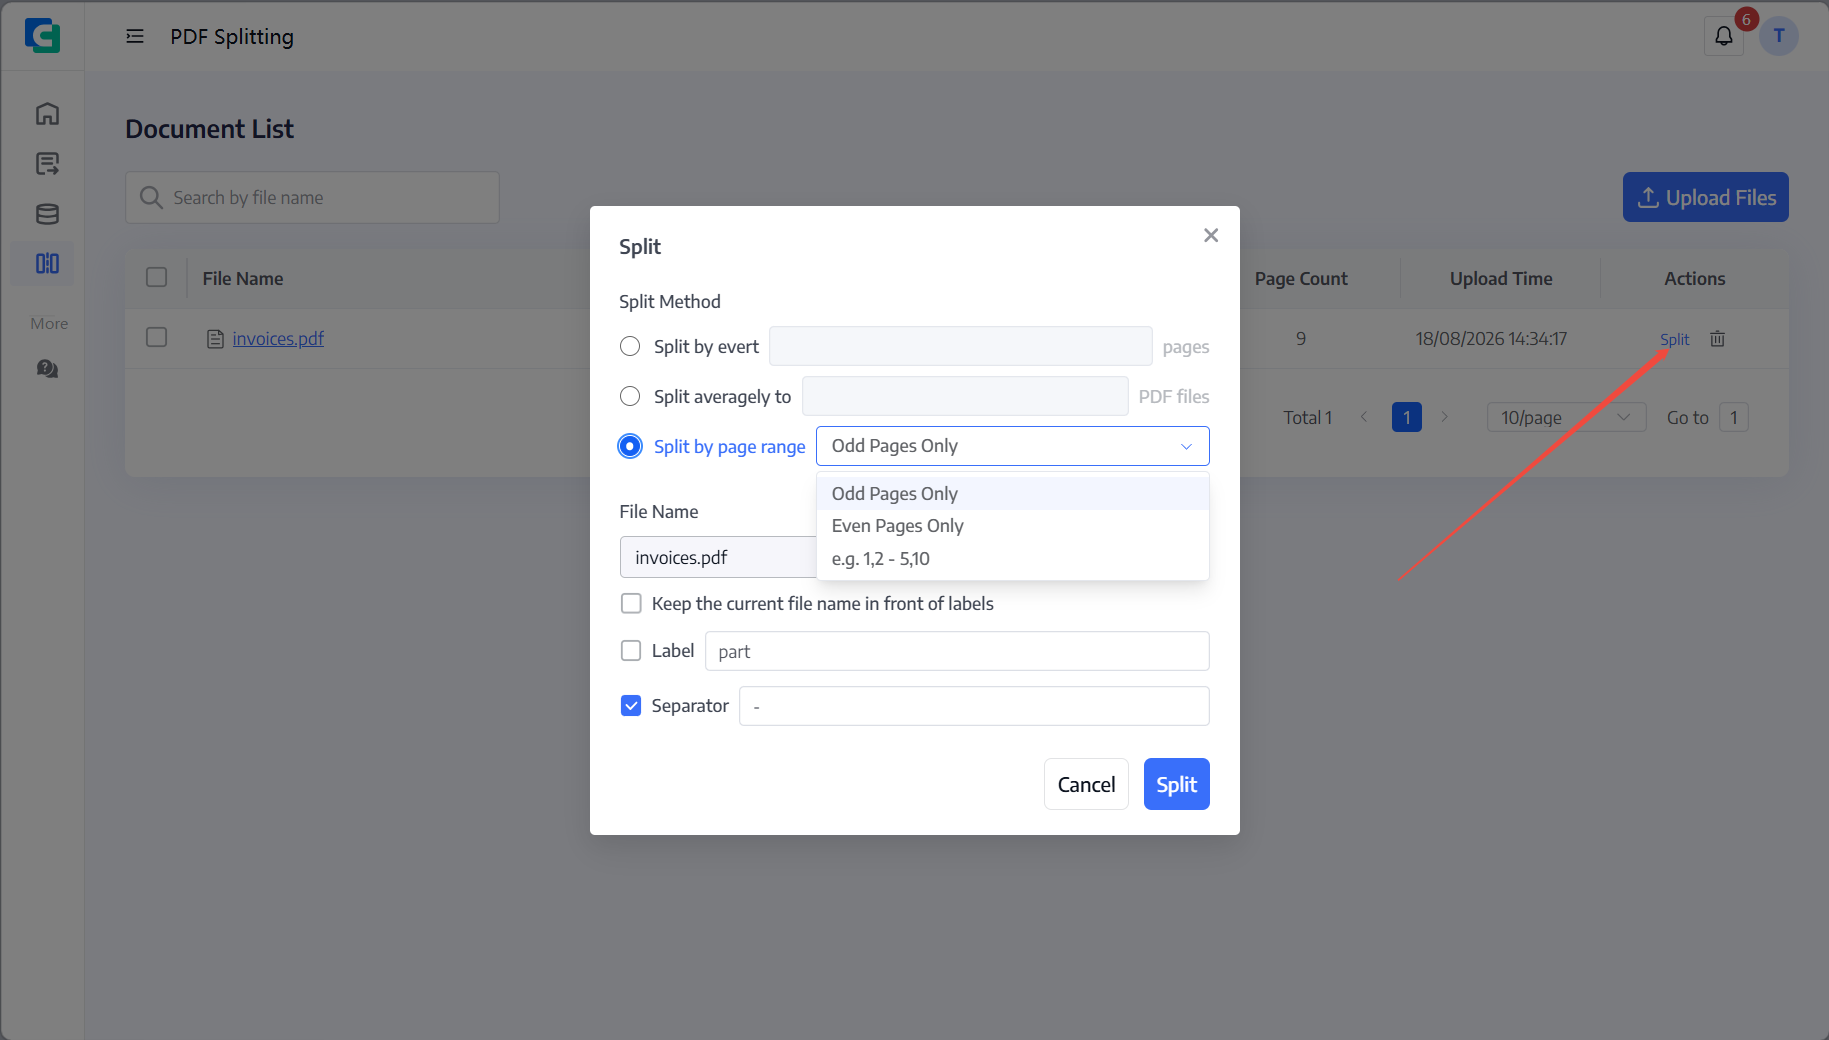
Open Document Splitting from the left navigation and upload PDF files. Select a file and choose one of the following rules:
You can customize labels and separators in output file names. Click Split and download the generated files when processing completes.